Since many of my students are new arrivals in the USA, it is not unusual for them to have never read the book. We always spend the bulk of our time on reading comprehension. We read the book, watch the movie (both the cartoon version, and the updated version starring Jim Carrey), and compare/contrast the different versions of the story. The culminating activity is always a board game show-down to see who knows the story the best. I always allow students to reference the book, if needed, while play How The Grinch Stole Christmas Review Game, but they take it as a personal challenge to try and answer as many questions as possible without looking back at the text. Some tips I've learned through the years for playing these types of games in class:
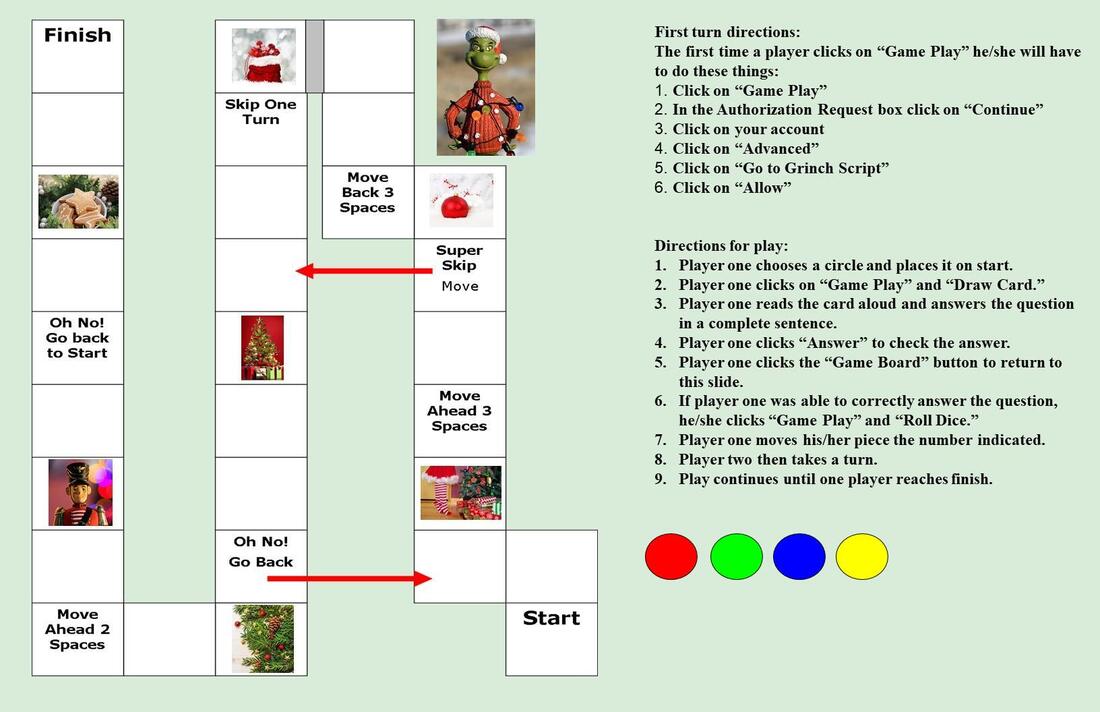
Like many others, I have been online this semester, so I converted my How The Grinch Stole Christmas Review Game into a digital format. I've shared in many different posts about my process for converting games, and about the Game Play Script that my husband wrote for me to allow students to "draw" a card and "roll" the dice. If you want to see this particular game in action, you can check out this YouTube video: Rather than repeat information I've previously shared, I want to share with you some of the best ways I've found to use digital board games in a remote learning environment. There are so many wonderful scripts, add-ons, and other innovative ideas, but there are still limits to what we can do in these digital environments. Here some of the different ways my students and I have successfully experimented with playing digital board games:
This semester has been a lot of trial and error for me and my students, as I'm sure it has been for many others. I'm sure there are many other ways of playing games in a fully remote classroom, but these are the four that have worked the best for us. I hope it helps you to get some ideas for your classrooms as well. Happy teaching, everyone!
0 Comments
and give each set of students a prepared egg carton. The first player shakes the carton, opens the lid, and multiplies the two numbers the pom poms are on. If he/she is correct, he/she gets a point. The second player then closes the lid, shakes, and multiplies the two numbers indicated. Play continues in this manner until time is up. The player with the most points is the winner.
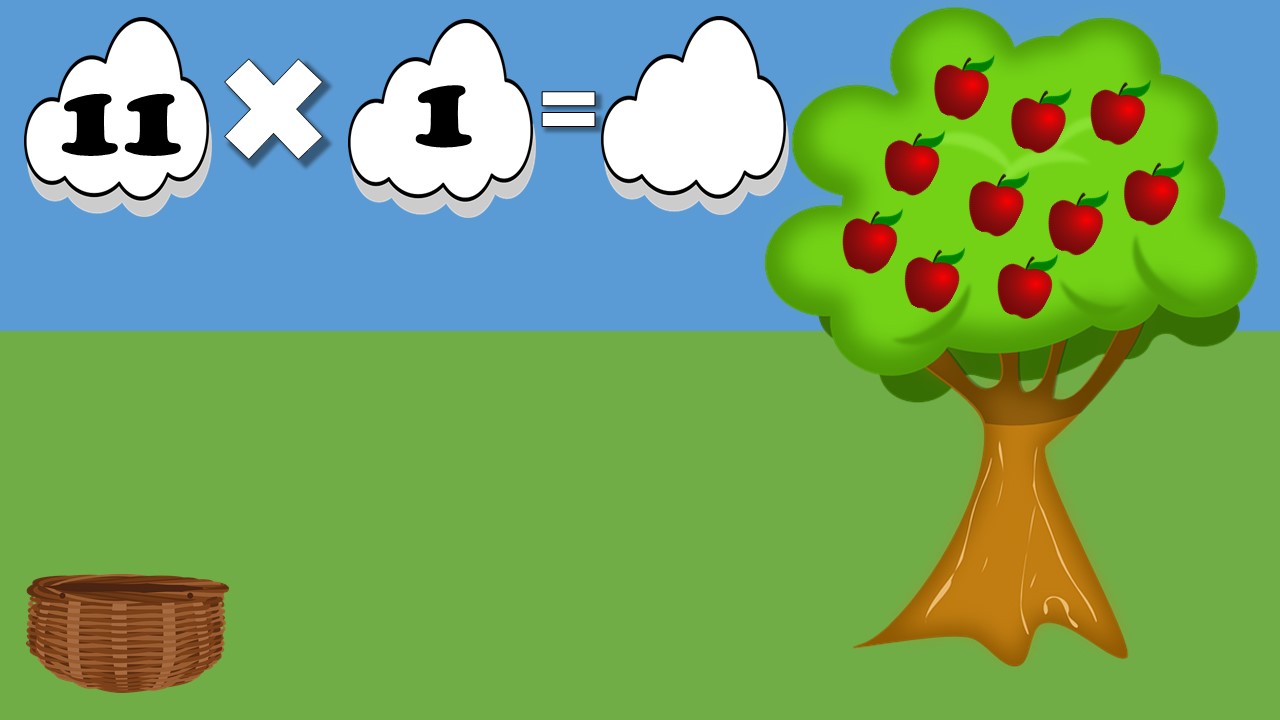
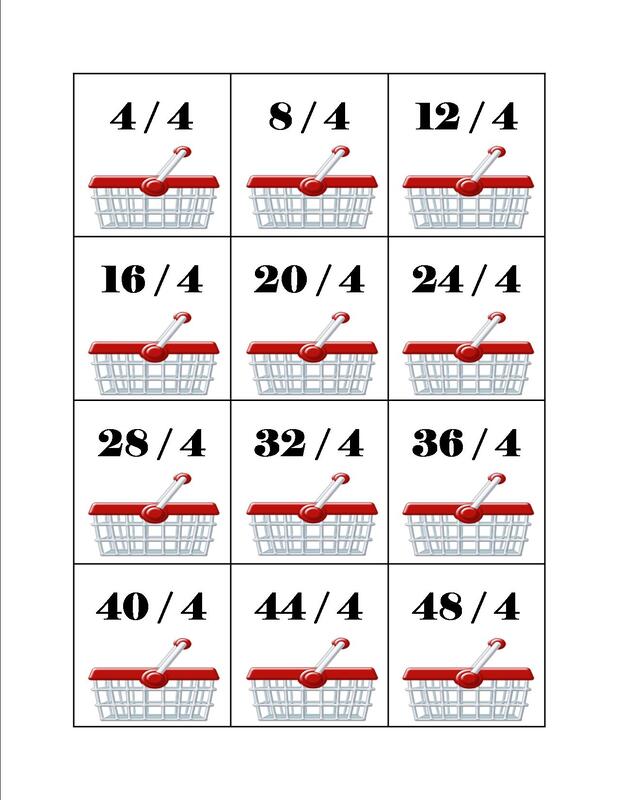
Since the cartons are free, pom poms are extremely cheap, and set up takes almost no time at all, I keep sets of these in my classroom year round. When there are five minutes left in class all I have to do is pass out the cartons and students can play. It's a great academic time filler for the end of class, or a nice brain break for when we need a change of pace. Toss 'N Multiply Requiring even fewer materials, and taking almost as little time to create, is my students' other favorite fact practice game. All you need for Toss 'N Multiply is a small soccer ball (the one I use is size 1.5, 6"), and a marker. The reason I use the soccer ball is that the clearly defined sections make it easy to label. Write the numbers 1-12 in the sections of the ball, repeating as many times as necessary. If you get a ball with black and white sections, simply use a silver marker on the black sections. Let the numbers dry (should only take a few seconds), and set up is complete. To play, have students gather in a circle. You can choose to play as a whole class, or in groups of three to six students. Students must toss the ball under hand, and catch it with two hands. Toss the ball to a student, reminding him/her to catch with both hands. The student then looks and multiplies whatever two numbers his/her thumbs are on. There will be a couple of sections without numbers, due to the presence of logos and other advertising, but the student can always use a different finger if his/her thumb is on one of those sections. If the student is correct, he/she stays in the game. The ball is then tossed to another student who repeats the process. If a student answers incorrectly, he/she is out of the game and must sit down. The last student standing is the winner. Again, this is the perfect game for filling time at the end of class, or a brain break during class. The ball takes up very little room at all, and other than having students stand in a circle, there is no prep work. Picking Apples This last activity does take a little more prep and time, but it is still a lot of fun. When we play Picking Apples, my students help me clear space by shoving all of the desks to each side of the room. We then have a starting line at one end, and a table for our apples at the other. I divide the students into two to four teams, and each team has a set of cards (we usually put them on a chair near the team's starting area) and a bucket. At the opposite end of the room I place a table and hundreds of miniature apple erasers. When I start the game, the first person on each team grabs the top card, computes the answer to the problem shown (I have sets for multiplication and division as well as addition and subtraction), runs to the opposite side of the room, gathers the correct number of apples for the answer, and runs back to the team. If correct, he/she earns a point for his/her team. The second person then takes the bucket, grabs a new card, runs to the other end, dumps out the apples from person one, and gathers the correct number for his/her card. Play continues in this way until time is called. The team with the most points wins. When playing this game with more than two teams, I will appoint at least one student to be my fellow answer checker. Also, when the answer is a large number (such as 144), I do not take time to count all of the apples, I look, estimate, and ask the student to tell me verbally how many are there. This year has brought new challenges to our lives; students are no longer all in the classroom together, and when they are in the classroom the sharing of materials is forbidden. Thus there is no Picking Apples game play this year. Instead I created digital task cards for students to practice with. Each card features a single problem written in the clouds, a basket to hold their apples, and an apple tree with over 150 apples on it (I copied and pasted the apple about 15 times, selected them all, aligned them to center and middle, and then copied and pasted the stacks to create "infinity" piles of apples in the tree.). On all of the sets except subtraction, the basket is actually a pile of baskets, so students can use groupings (such as repeated addition) to help them find the answer. These digital task cards allow students to safely use manipulatives to practice their basic math facts, 1-12 for multiplication and division, 1-20 for addition and subtraction. When making these kinds of digital activities I always design my non-moving elements in PowerPoint and save them as image files. I then upload those images as the background of my Google Slides. In order to speed up the background insertion (these activities had between 146 and 202 slides each!), I've long used the add-on Slides Toolbox. I once again used Slides Toolbox, but I also needed to do something else: randomize the slides. In order to be sure I included all of the facts students needed to practice, I created the task cards in order. When using paper task cards this isn't a problem, because I simply shuffle them before giving them to students. Digital task cards a little more tricky, and I needed a way to shuffle them so students would have to do more than count in sequence for the answers (multiplication is still in order because you may want to practice only certain facts). Thankfully, much as there's an app for every situation, there's an add-on for every situation today. I used every teacher's best friend, Google, and found an add-on called Slides Randomizer. This add-on will randomize the order of your slides once, or every time you open the file. You can choose to have the first slide remain stationary or not, and you can initiate a randomization of slides anytime you choose. In order to reset slides, you must use the back or undo button, and they will not return to their original order when you close the file. I decided it was worth a try, and it worked great. It was incredibly easy to use, and took hardly any time at all to perform the randomization of the slides. The only thing I wished was that I could choose the number of slides at the beginning to keep in place, as my activity has a title slide, a directions slide, and a helpful tip about groupings slide. I realized later that I should have just built my deck without those slides, randomized it, turned the auto-randomization off, and then added those three slides last, but at least I know for next time. I know most people don't automatically put math instruction together with ESL, but I have actually done quite a bit of it over the years. There's a lot of vocabulary in math, and it's an important subject for every student. I hope your students enjoy these fact practice games as much as mine. Happy teaching, everyone!
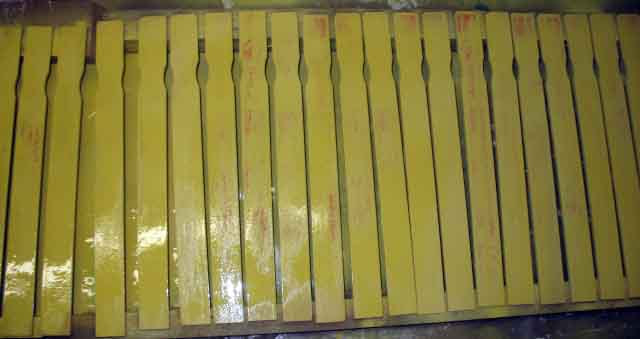
person has returned to the team, player two takes a stick and repeats the process. Play continues until all of the sticks have been placed in cans. I then quickly check the sticks in each can, giving teams one point for each correct placement (thus the different color sets of sticks). The winning team is the team who finished the fastest (I give three points to first place, two points to second, and one point to third) and most accurate (it happens fairly often that the slowest team actually wins the game due to increased accuracy).
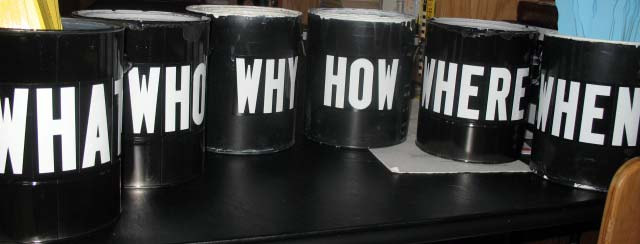
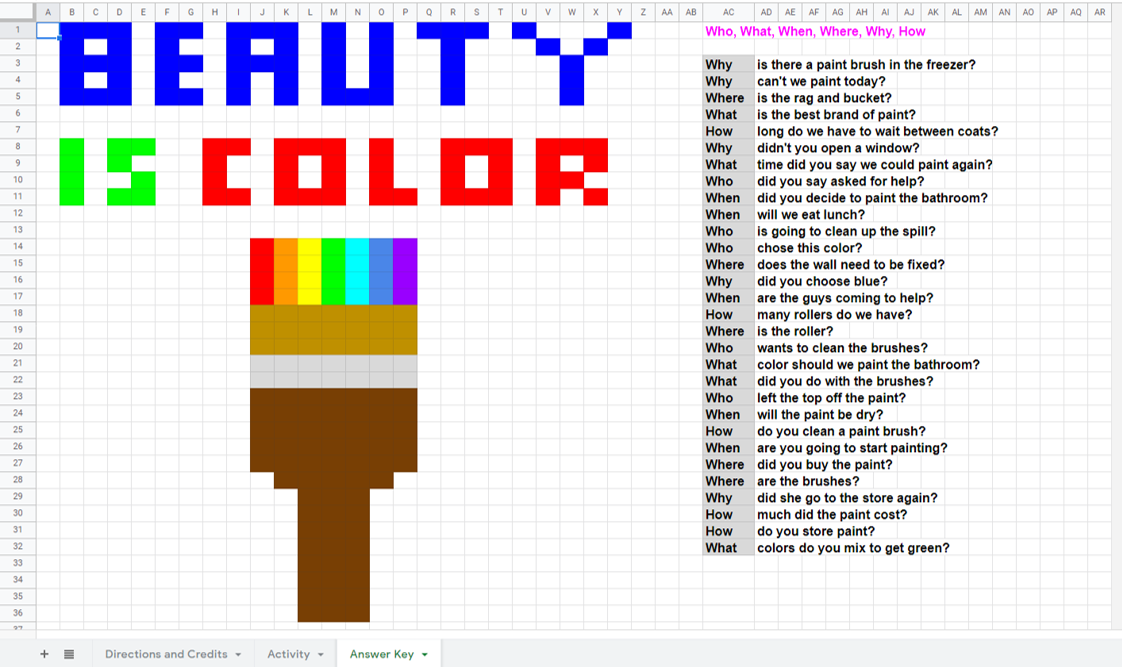
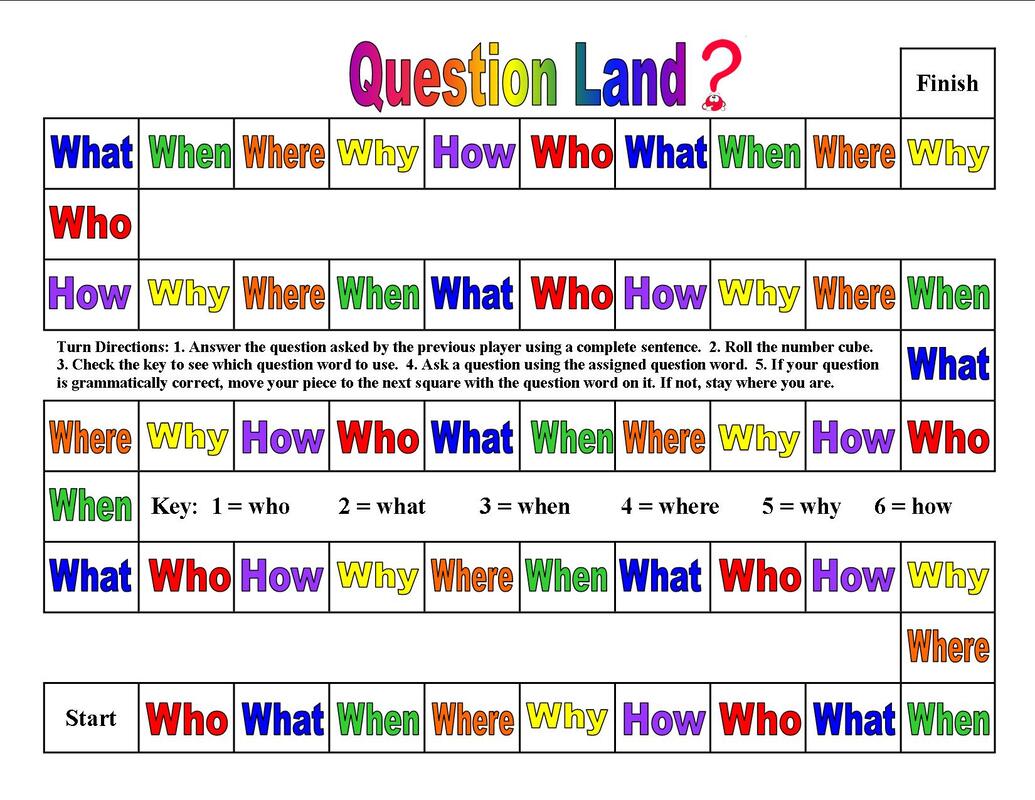
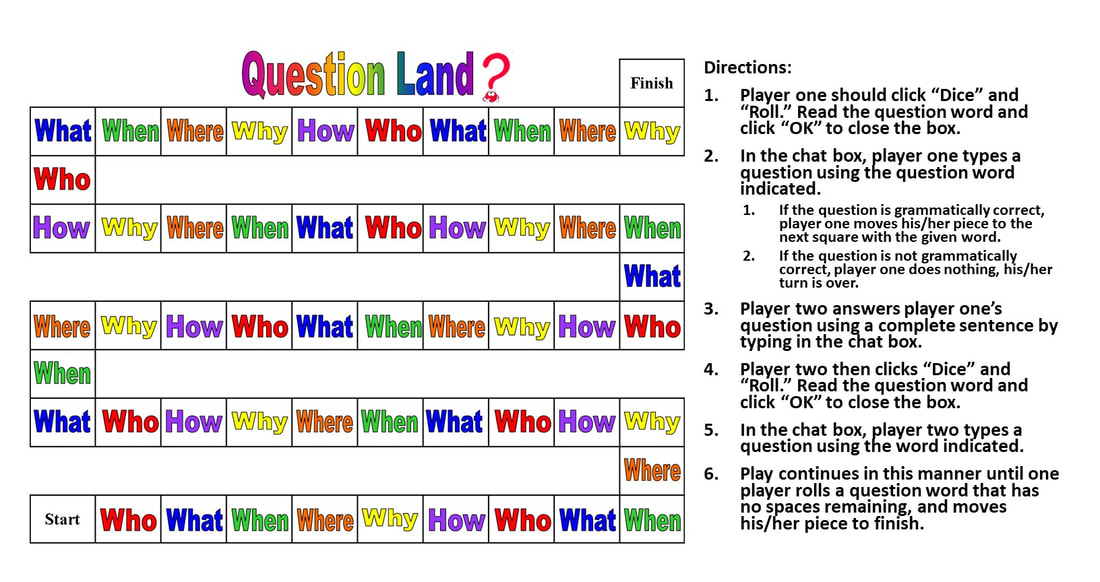
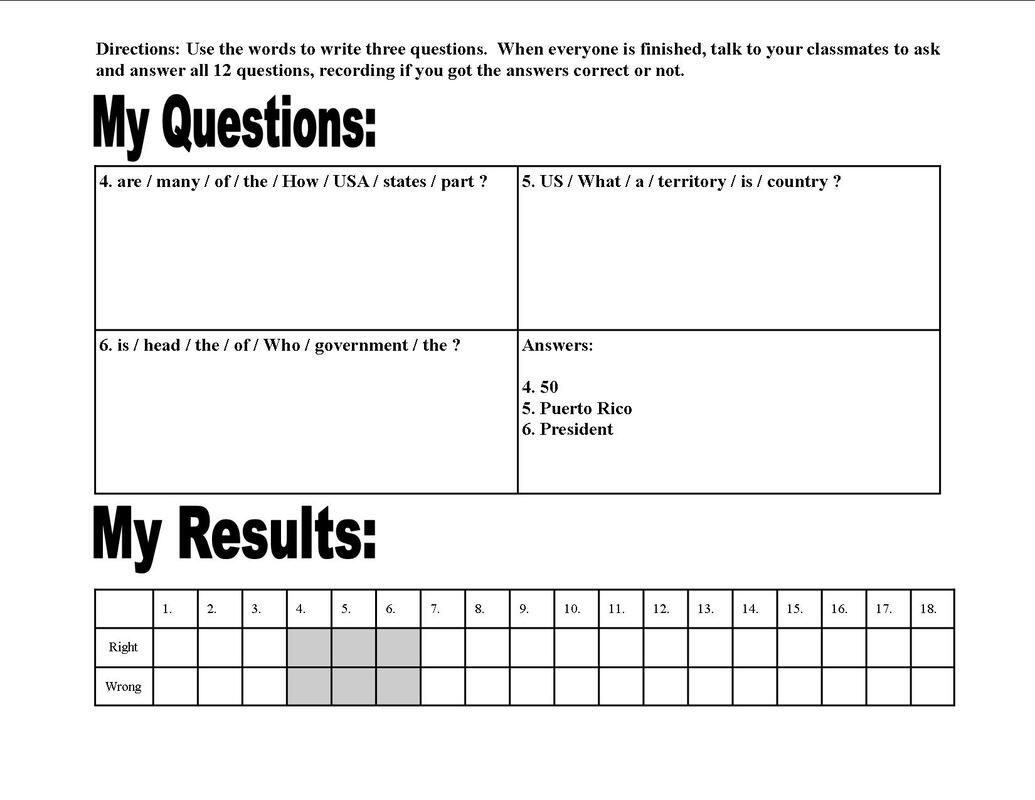
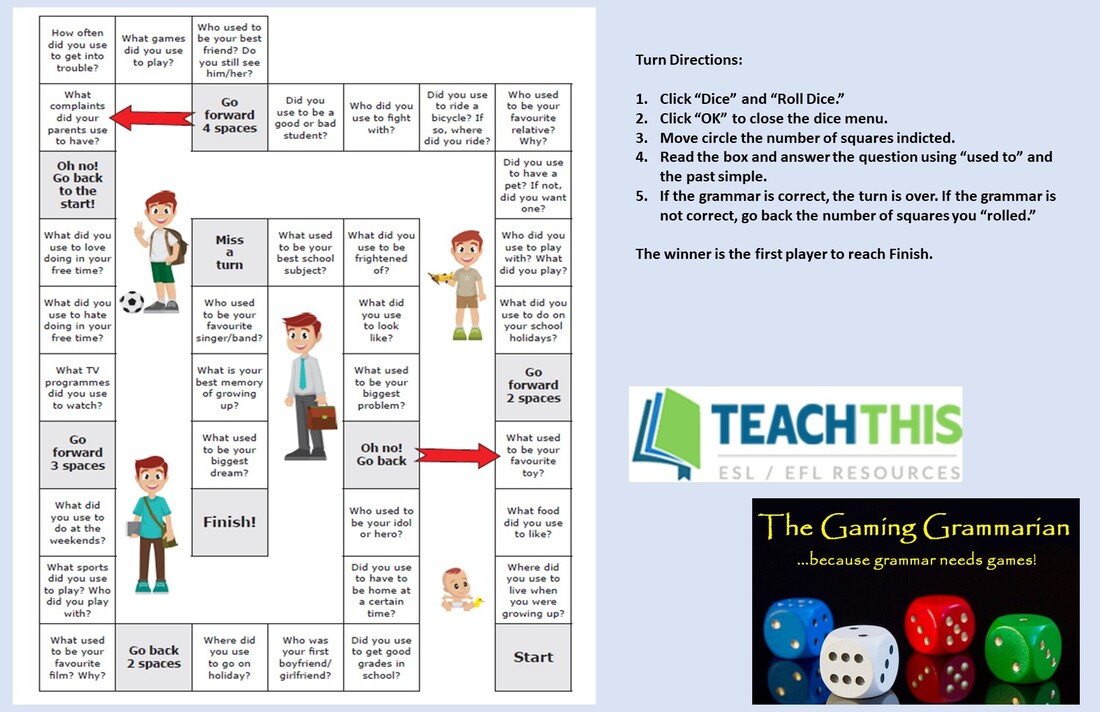
Students love paint can questions, and usually beg to play again, and I almost always give in to them. This semester, and it's looking more and more like next as well, we are fully virtual. I enjoy the game as much as the students, so I really wanted to find some way to use it digitally. I considered a lot of options, including digital task cards, self-grading digital task cards, and even another cover up or board game, but really wanted something special for this activity. I finally settled on creating another mystery pixel art activity. I used the same questions as the paint can game, and themed the picture around color and painting (see image above). You can get either the Google Sheets or Microsoft Excel version of the mystery picture by clicking the picture and button above, or the links earlier in this sentence. Once we have worn ourselves out running back and forth, I like to play one more board game to practice asking and answering questions. Question Land is a game that is very loosely based on Candy Land. In the paper version students roll a number cube to see what question word they will use (the numbers and words are on the game board for easy reference). In the digital version, they use a specially scripted "Dice" menu to "roll" a question word. After discovering which question word a player will use, game play is the same for both versions. The student first answers the question asked by the previous player with a complete sentence. Then he/she asks a question of his/her own, using the word indicated. If the question is grammatically correct, the player moves his/her piece to the next square containing the question word he/she used. If the question was not grammatically correct, he/she stays in place. The first player to reach finish is the winner. The finally activity we use in our unit is another free download from my Teacher Pay Teachers store. Questions and Answers is a writing and speaking activity for up to six students (if you have more students simply make more copies of each page). Each page has three different questions with the words mixed up. In a separate square are the answers to the questions. Students must unscramble the questions and write them correctly in the provided space. Once students have all had a chance to unscramble and write their questions, they walk around the room, talking to one another. After finding a partner, they take turns asking and answering questions. At the bottom of each page is a place to mark if they were able to answer their partners' questions correctly or not. After students have asked their questions of five others, and answered the remaining 15 questions in the activity, they return to their seats. They count up how many questions they were able to answer correctly (all of the questions relate to USA history), and the student with the most correct answers is declared a winner. As stated before, you can download this activity for free by clicking the picture above, or the Questions and Answers links in this paragraph. By the time we finish all of these games and activities students have a good grasp on question words and how to use them. If you're looking for a quick way to grab most of these activities (you'll have to make your own beach ball and paint can set), you can use the buttons at the bottom of this post. Three different discounted bundles are available: paper activities only, digital activities only, and paper + digital activities. Happy teaching, everyone!  On Monday I shared with you one of the fun games that my students and I play to practice prepositions, Mousy Prepositions (paper, digital). Of course prepositions is not an easy topic and we practice it quite a bit, so we need more than one game. Today I'd like to share with you three other activities that my students particularly enjoy when learning prepositions: Going Buggy for Prepositions, Preposition Pictionary, and Lego Preposition Build.
Going Buggy for Prepositions Going Buggy for Prepositions is an activity is based off of The Insect Game, which I read about in a book that I've long forgotten the title of. To play you will need plastic toy insects, a set of noun cards, and a set of preposition cards. The free download linked above, and via the button below, will give you noun and preposition cards you can print. I recommend printing the noun and preposition cards on a different colors of paper to make separating them easier. Place students in groups of 2-4 and give each a set of supplies (at least one insect and set of cards per group, but my students always want their own insects). On their turn, each student draws a noun card and a preposition card. The student must then make his/her insect demonstrate the chosen preposition with the selected noun. If he/she is able to do so, he/she gets a point. This game is not quite as exciting as those that follow, but it does get the students up and moving, which is generally a good thing. Preposition Pictionary I wish I had some great inspiration story to share with this game but, as is often the case, it was born out of desperation. There was some kind of problem in the building, nothing serious, but all students were told to remain in their current classrooms until further notice. Since we'd already been together for over an hour that day, the students quickly began to get restless. I wanted our time together to be productive in some way, but I didn't want it to be boring. We'd been practicing prepositions, but had already played Going Buggy for Prepositions, and I was struggling to keep students engaged. One of the students started doodling on the board and another started trying to guess what she was drawing. Then it hit me, Prepositions Pictionary! I grabbed the prepositions cards from Going Buggy for Prepositions, quickly divided the students into two teams, and explained the basic rules of Pictionary to them. On a team's turn, one person would come up, draw a preposition card and, without showing it to anyone but me, illustrate the preposition on the board. Their teammates would then have to try and guess the preposition being drawn. If they were successful before time ran out (I gave them 60 seconds), they got a point. If not, the other team got one chance to guess. They LOVED it! When the announcement came dismissing them to the next class they actually groaned aloud. From then on Preposition Pictionary was the game they begged to play when we had extra time. One enterprising group even revised the rules because there was a field trip and only three people were in attendance. They decided to play as individuals. If you guessed the preposition you got two points and the right to be the next illustrator. The illustrator whose illustration lead to the correct guess received one point. Lego Preposition Build Who doesn't love Legos? I always kept some in my classroom and even my middle schoolers liked just sitting at a table (or on the floor) and building things while chatting quietly with a friend. Some might say they were wasting time, but I think it was a great brain break, and since they were usually talking in English, in an ESL classroom, it was good speaking practice. We also used the Legos in our math lessons (especially when learning fractions), but I always wanted to use them in a grammar lesson. Then one day I received an email with picture instructions for building some object out of Legos and it hit me: prepositions! That summer I looked for the best deal I could find on Legos and bought some extra (This Classic Set was the best deal I found, especially since I had the time to wait for a sale.). I also saved and printed all of the building directions I could find, which ended up being 50 in total. I have uploaded the pdfs to a Google Drive folder and the button below this post will allow you to view the folder. You will want to either download the files you want, or save a copy to your own drive, to ensure continued access. By the time school rolled around that fall, I was ready to go. The students partnered off and arranged themselves at tables around the room. I gave a bin of Legos to each set of four students and one of each pair received a set of picture instructions, which they were not to show their partner. The student with the instructions then told their partner which Legos to choose and how to arrange them to form the object in the picture. Since the picture instructions already had the process broken down into steps the student could concentrate on giving clear instructions without worrying about how the object was built. After the building phase was complete students compared the picture to the final product to see how they did. The next day (or the same day when I had a block schedule) the partners switched roles and completed the activity again, but with a new picture. The students loved it and practiced a lot more than just prepositions. The next year when some of my repeat students heard we were going to work on prepositions again they specifically asked to do this activity. Well, to quote the Looney Toons, "That's all folks!" Those are my four best non-worksheet preposition practice activities. Unfortunately I've only managed to translate Mousy Prepositions to the digital world, but I'm still thinking about the others. If I get hit with inspiration, or discover a great resource, I'll let you know. In the meantime, happy teaching!
mean about a time best forgotten?). My mother very calmly looked at me and said, "Prepositions are easy. Just think of everything a mouse can do to a box." That, among a few other famous mnemonic devices (I'll forever remember the capitol of Nebraska because, according to my mother, "Lincoln had big knees, but he never went to Nebraska."), became my academic salvation. I did pass my test, and to this day, prepositions, mice, and boxes are forever linked in my brain.
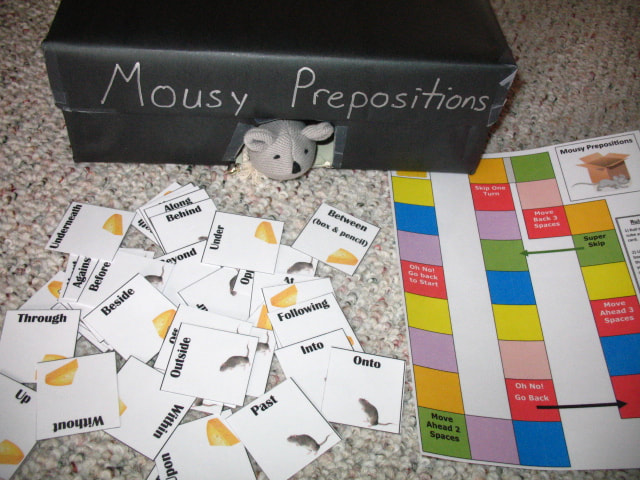
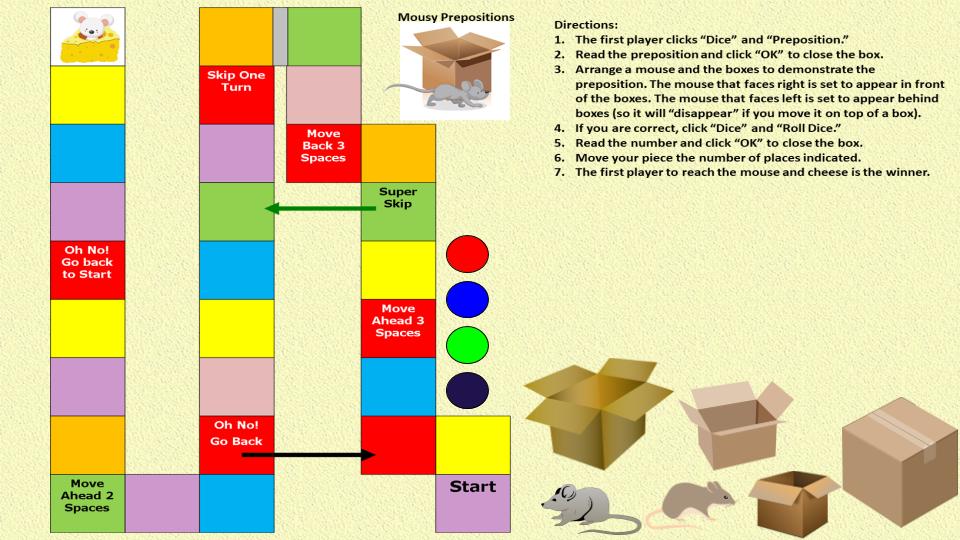
When I became and ESL teacher and had to teach prepositions, my students were whining and struggling, my mother's mnemonic device was echoing in my ears, and I did what I always do when faced with a boring grammar concept that must be mastered: I created a game. Prepositions are visual and I wasn't satisfied with simply making a board game with cards and tokens, I needed a mouse and a box! The mouse was relatively easy to obtain, they are plentiful and cheap in the pet section of any store. The box posed a bit more of a challenge as I needed something the mouse could be in, on, go through, etc. After thinking about it for awhile, I took an old shoe box and wrapped it in black bulletin board paper, being sure to wrap the lid separately. Then I cut a hole through each side of it, making a tunnel for my mouse to pass through. A quick game board and some cute preposition cards decorated with mouse clipart, and Mousy Prepositions was born. Students could draw a card, read the preposition, use the mouse and box to demonstrate the preposition, and (if correct) roll a number cube to advance on the board. My students loved it and my only challenge was keeping my pet cats away from the toy mice. :D Now that digital learning has become a necessity, I didn't want to give up my fun game, so created a Digital Mousy Prepositions game as well. I simply turned the game board into an image file and inserted it onto a PowerPoint slide that I'd resized to 17x11 (see my earlier blog posts Alphabet Adjective Zig Zag and Too or Enough for more information on how I create my game boards). The clip art for the mice and boxes was easily obtained from Pixaby. The part that I had to think about was the prepositions. I really didn't want my students having to click from slide to slide to "draw" a card, as they do in other games that utilize the game play script my husband wrote me. I wanted them to play the entire game on the slide that held the game board. The answer ended up being a custom prepositions script, again written by my husband, combined with the dice script he'd previously written. The resulting game was something students could play on a single slide, with minimal clicks. Take a look and see for yourself: I owe a big thank you to both my seventh grade ELA teacher and my mother for inspiring these fun (and free) games. My students definitely think this is a much more enjoyable way to learn prepositions than endless pictures and worksheets with questions such as: "The ball is ____ the desk." Stay tuned later this week for two other rodent-free fun (and free) ways my students and I practice prepositions. Get both versions of the game, and the other resources mentioned in this post, by clicking the pictures and links above or the buttons below!
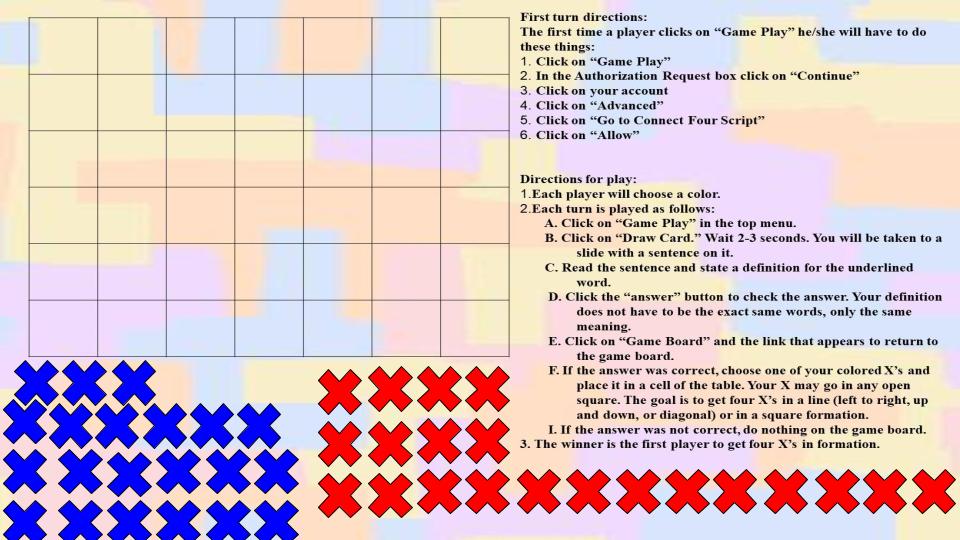
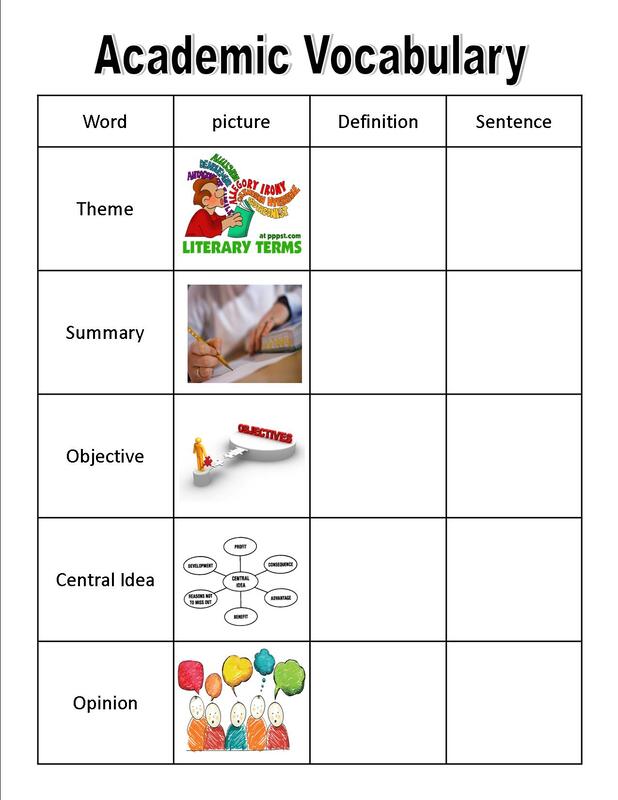
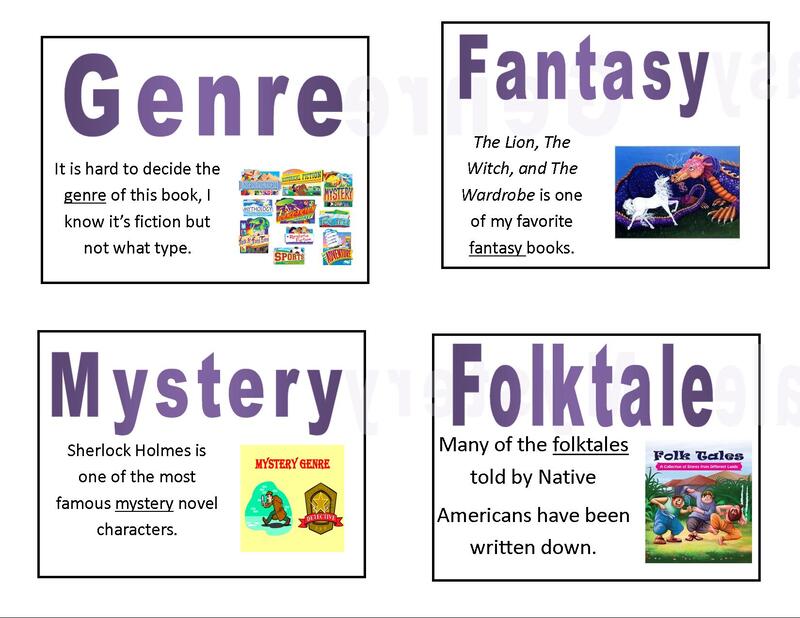
To create the game I started, as I almost always do, in PowerPoint. As I've stated before, in order to prevent things from being accidentally (or accidentally-on-purpose) edited or deleted by students as they play, I put as much as possible into the background. Thus, I start creating my games in PowerPoint and design all of the elements that I don't want students to change or move on the slide. I then save my slides as images (File-Save As-choose .jpg or .png-all slides). In this case, the slide creation was quite simple. I needed a title slide, a game board slide with directions, question slides, and answer slides. My questions were sentences using the academic vocabulary words, the answer slides were definitions for the words. Since I didn't have time to create 150 new example sentences I decided to use the sentences I'd already written for my 30 weeks of academic vocabulary posters. Transferring the sentences was easy. I set up the text box on my first question slide (changed the font, size, and made it bold), opened my original file, copied the sentence, right clicked on my question slide in PowerPoint, and under paste chose the A symbol (text only). This pasted the text into my slide but kept the formatting I'd just set up. I added a rectangle shape that said "Answer," and my first question slide was finished. In order to keep everything the same, I then created a duplicate slide to be my answer slide. I changed the text in the rectangle shape to "Game Board," and changed the question text to be the definition (also copied from the original file) instead of an example sentence. For each subsequent word I created a duplicate of the question or answer slide preceding it and changed only the question or answer text. The one thing I had to be sure to do while creating the question and answer slides was keep my question slides together. In other words, I couldn't have my first question on slide three and the answer for that question on slide four. If slide three was question one, then slide four needed to be question two, and so on. This is for two reasons: 1. the game has to remain in edit mode when students play it and I don't want them to be able to see the answer in the slide sorter on the left, and 2. I knew I'd be using the "draw" a card function in the game play script my husband wrote me and it requires all of the question cards to be sequentially numbered. This meant I had to do some scrolling as I set up the slides, but it wasn't difficult. Once my slides were all designed and saved as images, it was time to insert them into Google Slides. The easiest way to do this is to use Slides Toolbox. The toolbox add-on has an insert tool that allows you to make slides from images and set the image as the background. After opening the toolbox and selecting the images I wanted it took about 2 minutes for everything to be uploaded and set up. Two minutes may seem like a long time, but it is much faster than trying to set over 150 slides' backgrounds individually! The next step was to set up hyperlinks to make my "Answer" and "Game Board" buttons functional. To do this I used the shape tool to draw a box over the "Answer" button on my first question slide. I then changed that box's border and color to transparent. Then I copied the box and pasted onto all of the following question slides. Then, noting the number of the first answer slide, I went back to my first question slide and hyperlinked the "Answer" button to the first answer slide. To do this I clicked on my transparent box, clicked the link button in the toolbar, chose slides in this presentation, and chose the slide number for the first answer. I then repeated these steps for each of the subsequent questions, simply adding one to the slide number I was linking to (question one linked to slide 79, question two linked to slide 80...). Making my "Game Board" button functional was much easier. I simply added a clear box to the top of my "Game Board" button on the first answer slide and linked it to slide three (my game board). I then copied this linked rectangle and pasted it onto each subsequent answer slide. I was now ready to install the game play script. This script adds a menu item to Google Slides that says "Game Play." The sub-menus are "Draw a Card" and "Roll the dice." This game does not require dice, so I had my husband take out that part of the script. Both written and video instructions for installing and using the script are included with the download. You can get your own copy of the script by using the button below. Finally, I needed markers for the game board. I first inserted an X shape (I use the one found under the equation section of the shapes too.). I then copied and pasted it 41 times, so I had 42 X's in total. To get it the size I wanted, I selected all of the shapes, clicked arrange, align, and center. This put all of my X's on top of one another and I was able to easily drag the corners to get them to be the correct size. I then changed the color and distributed them across the bottom of the screen. Finally, I selected half of the X's and changed the color again so each player would have his/her own set. This is the first digital game I've created that does not have a paper-version as well. While there were other activities that changed format or type when they were converted to digital, this one is the first that is completely new. In the future I hope to create a paper-based version, but for now the only option available is digital. You can get either Context Clues Connect Four game by clicking the pictures above, or a discounted bundle of both by using the button below. You can also get the paper-based 15 week academic vocabulary units by using the pictures above, or a bundle of all 30 weeks by using the button below. Also available is a bundle that combines both Connect Four games and all 30 weeks of academic vocabulary.
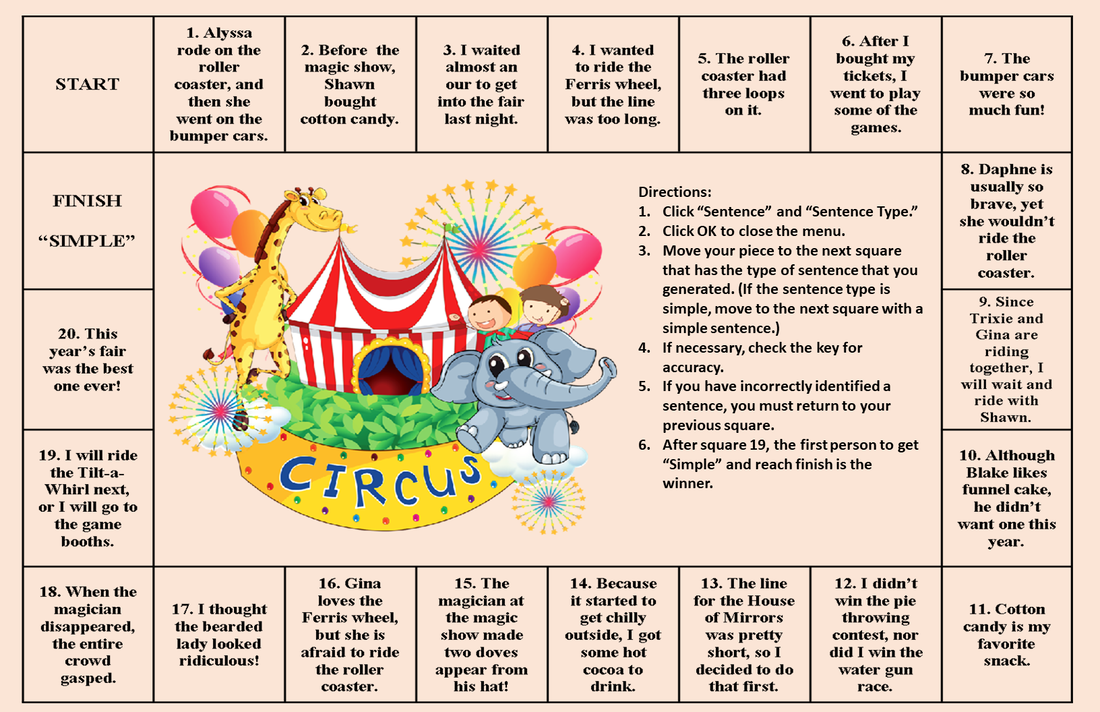
Sentence Scramble is unique because it has a very specific script to generate the type of sentence students must find. It's also unique because it involves a magic reveal answer slide. I described the step-by-step process of creating magic reveal answers in a previous blog post, and it was the perfect solution to my answer key problem for this game. I knew students would need an answer key, but didn't want to have to set up a hyperlink for every square on the game board. I also didn't want to have a slide that just showed students every answer from the board. The magic reveal trick was perfect because students can drag the magnifying glass to reveal only the answer they need while the others remain hidden.
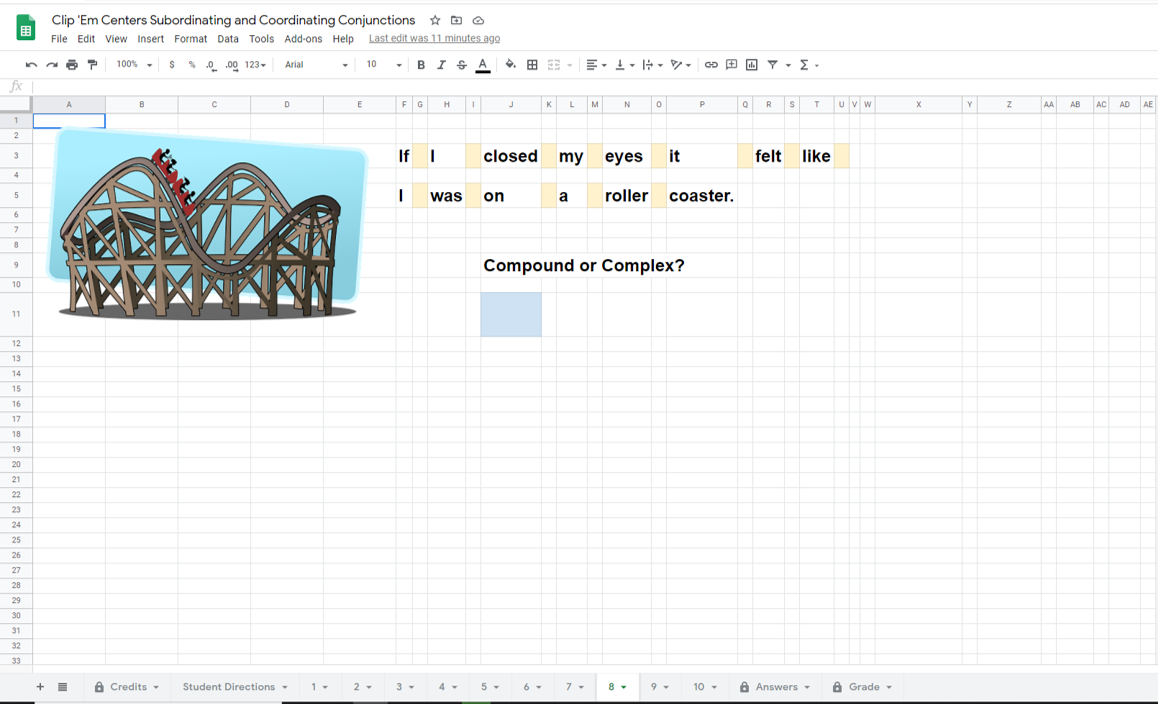
The final activity pictured above, Clip 'Em Centers, is a set of self-grading task cards, not a board game. I gave the step-by-step directions for creating these cards in a previous blog post, but I'm rather enamored with them. Students type their answers into specific cells of a Google Sheet or Excel spreadsheet, those answers are automatically recorded and graded on a separate tab, and a final tab gives students their total results. While the activity doesn't involve any scripts, it does solve my problem of not knowing what my students answered when they completed digital task card activities. In short, the past couple days has been a kind of culmination of all my learning over the last few months. I'm excited that I'll be able to use so many of my favorite paper games and activities this semester during distance learning. I hope you find them helpful as well!
fits lately. My own things were easy, I have all the original files and was able to edit and convert as needed. Not so much with those that came from other sources. For some of the activities I ended up creating something brand new (like my Context Clue Connect Four Digital Game, blog post coming soon), but I don't have time to create something to replace all of my existing games and activities (and I really like some of them). Today I figured out how to use all of those great PDF games I have!
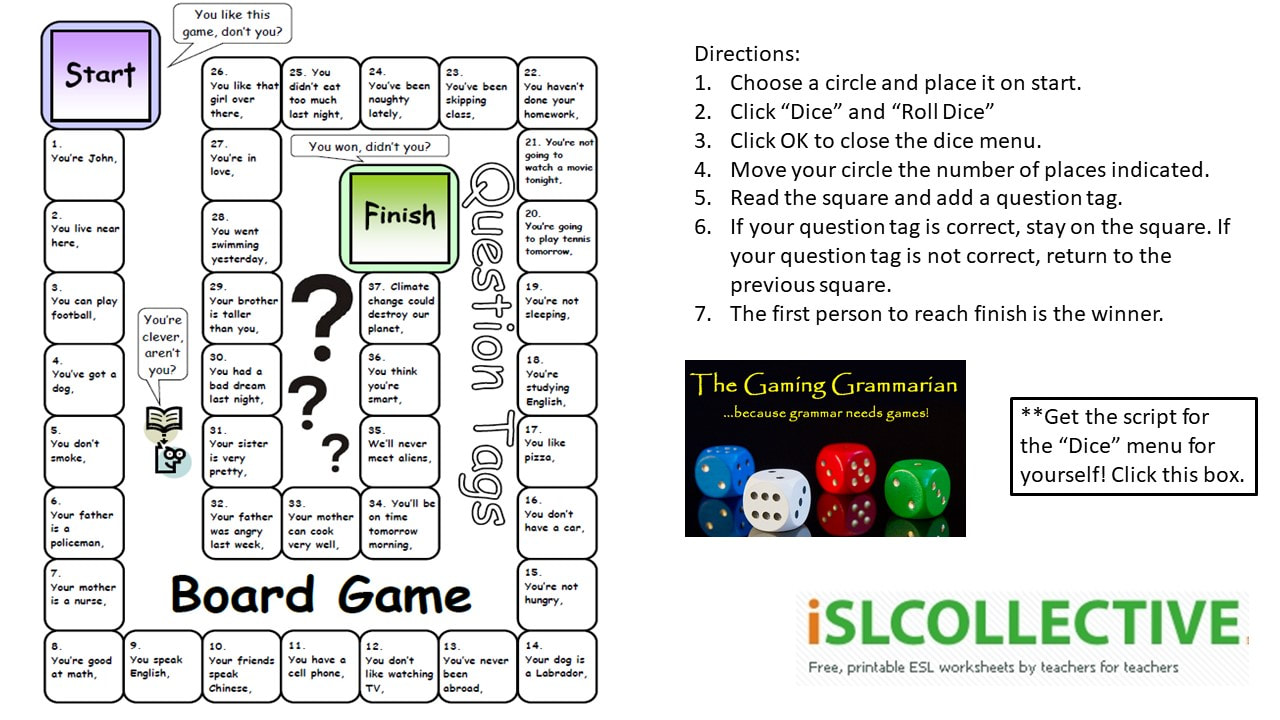
My first thought was to copy and paste the part of the PDF document that I wanted. Nope, didn't work, couldn't select anything. Second, I tried opening the PDF in Adobe Photoshop Elements, but that didn't work either. Finally, I remembered seeing a video about how to create editable text from a non-editable PDF. In the video the presenter talked about using the Snipping Tool to take a screenshot of part of the PDF. I decided to try it, and it worked! I just searched for Snipping Tool on my computer and it came right up. I clicked on New, drew a box around the part of the PDF I wanted, and saved the image to my computer. Now that I had the game board the rest was easy. I opened a new PowerPoint file, resized the slide to be 17x11 (click on Design, Slide Size, Custom), and started designing. First, I built my title slide. Having a title slide isn't necessary, but I like to put one there so I can quickly know what game I'm looking at in my Google Drive. Second, I added a second blank slide and inserted the image of the game board I snipped earlier (Insert, Pictures, This Device). Third, I inserted a text box and typed out step-by-step directions for students to follow when they played the game. Finally, I put in the Teach This logo (I am very strict with my students about plagiarism and wanted to be sure to give proper credit to the creator of the game board.) and my own Gaming Grammarian logo. Why did I do all of this work in PowerPoint when the game is going to be played as a Google Slide? Simple, protection from accidental or accidentally-on-purpose edits by students. I design all unmovable parts of my digital activities in PowerPoint or Publisher and save them as images. To save these slides as images I clicked File, Save As, my destination folder, and chose .jpeg as my file type. PowerPoint will then ask if you want just the one slide, or all of them. If you choose all slides PowerPoint will create a new folder and place all of your slide images inside it. It was now time to put everything into Google Slides. I opened a new Slides presentation in my Google Drive and named it. Since I only have two slides in this game I didn't bother with the Slides Toolbox add-on, but I highly recommend it for when you have a large number of slides to upload as backgrounds. With only two slides it was just as easy to right click on the white background, choose Change Background, Choose Image, and navigate to where PowerPoint had stored my backgrounds. After adding my title slide I added a blank slide (click the + button) and repeated the process to add the game board. Now there were only three things left to do:
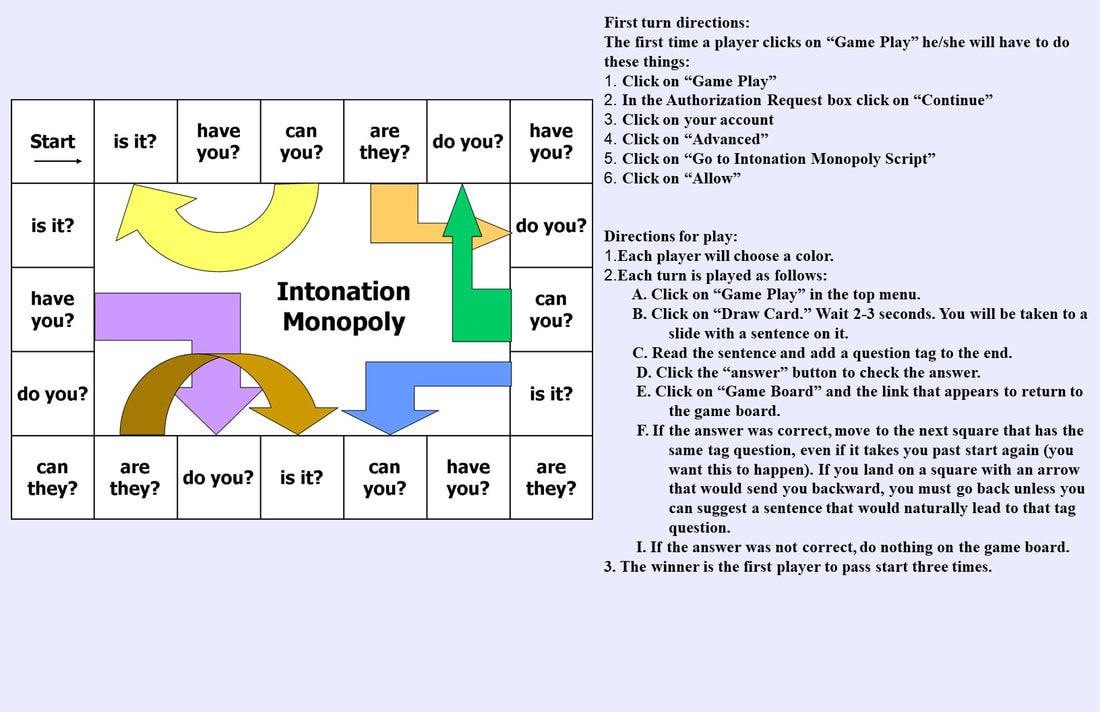
There are a lot of options out there for dice, but most of them involve going off to another site, and many of my students struggle with moving between tabs on the computer. To avoid these problems, as well as the distractions that inevitably arise from students moving around the web, I use a special script that my husband wrote for me. The Dice Script adds a menu item to Google Slides that says "Dice." The script doesn't actually add pictures of dice, and nothing moves on the screen, but it does produce a random number between one and six. My students don't mind not having actual dice at all and find using the menu to be quite easy. If you are interested in how I add the script I've made a video showing the step-by-step process: Once I hit the reload button (to activate the script, you only have to do this after installing the script the first time), I was ready to play. To allow my students to play the game I make a copy for each group of four students (so they won't all be playing on the same file and because I never let my students have access to my original files). Each copy is then shared, with editing rights, with the four students who will play it, and we are ready to go. The students open the file using the share link and are automatically in the same file. Remember, the file must remain in editing mode during the game! If the file is put in present mode the game pieces will become unmovable and students will lose access to the dice menu. Students can talk to one another via our virtual meeting platform (we're using Blackboard Collaborate) or through the built in chat feature found in all Google Apps. In class I wander from group to group, listening in and helping as needed. Digitally I jump in and out of breakout rooms. If I wanted to be able to check all the sentences my students use I could use the comment feature. Tell students that on each turn they need to right click on the square where their piece is, click Comment, and type out their sentence before clicking Comment again. That will create a record of all sentences that can be viewed later. I have to say, this is a game-changer for me! The list of resources that needed to be either converted to digital or replaced with something new was starting to depress me. Now I feel re-energized and excited about the rest of the semester. Want this game for yourself? Click on the picture above or the button below. The link is a force a copy link, you'll be prompted to add a copy to your Google Drive. Please note, the dice script needs a little longer to load, it may be as long as 30 seconds before it appears. The exact length of loading time depends on your connection.
In order to facilitate their emotional vocabulary learning, I developed the game How Do You Feel? This simple cover up game is a fun introduction and practice activity for nine emotions. I explained cover up games in a previous blog post, but I'll give you a brief review. In short, the goal of the game is to cover up a certain number of spaces on your game board before your opponent can do the same. Sometimes I have students play this game tic-tac-toe style (cover three in a row). Sometimes I require the four corners. Other times I tell them they have to completely cover their board to win. Mostly it depends on how much time we have to play which version I choose.
To play How Do You Feel? the first player will either spin the emotions spinner (paper version) or use the specially scripted emotion generator (digital version). Either way, the student will be given a specific emotion to find on his/her game board. The student then locates the emoji representing the given emotion, and gives an example of a time he/she might feel that emotion (i.e.: I feel tired when I stay up late watching soccer.). If the sentence is correct, the student is able to cover that emoji (I use milk jug lids for the paper version and there are X's provided for the digital version). Player two then takes a turn. If, in subsequent turns, players spin or generate an emotion that is already covered, the turn is forfeited. The first player to cover the agreed upon amount of spaces is the winner. As mentioned above, I explained how to make digital cover up games in a previous blog post. This digital game does have a specially scripted menu item though for generating the emotions. Here's a video to show you what that menu looks like and how to play the game: One last thing before I go, the script from this game is not available for separate purchase, it's too specific, but other scripts for making your own digital games are available. Each of the scripts comes with a video showing you exactly how to install and use it. You can use the buttons below to get either version of this game, or any of the various scripts available, for yourself. Happy teaching everyone!
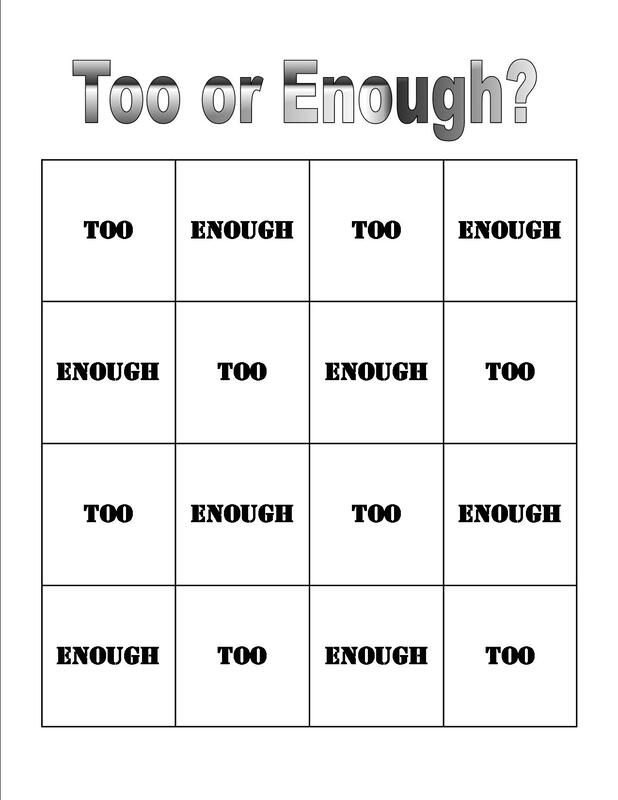
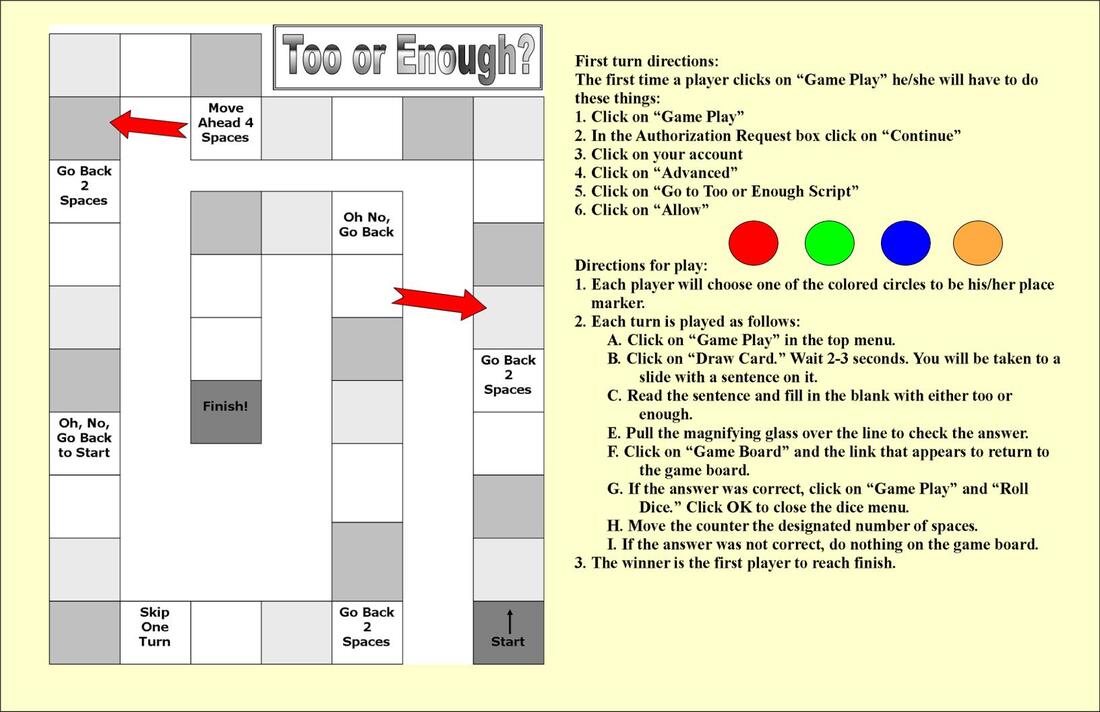
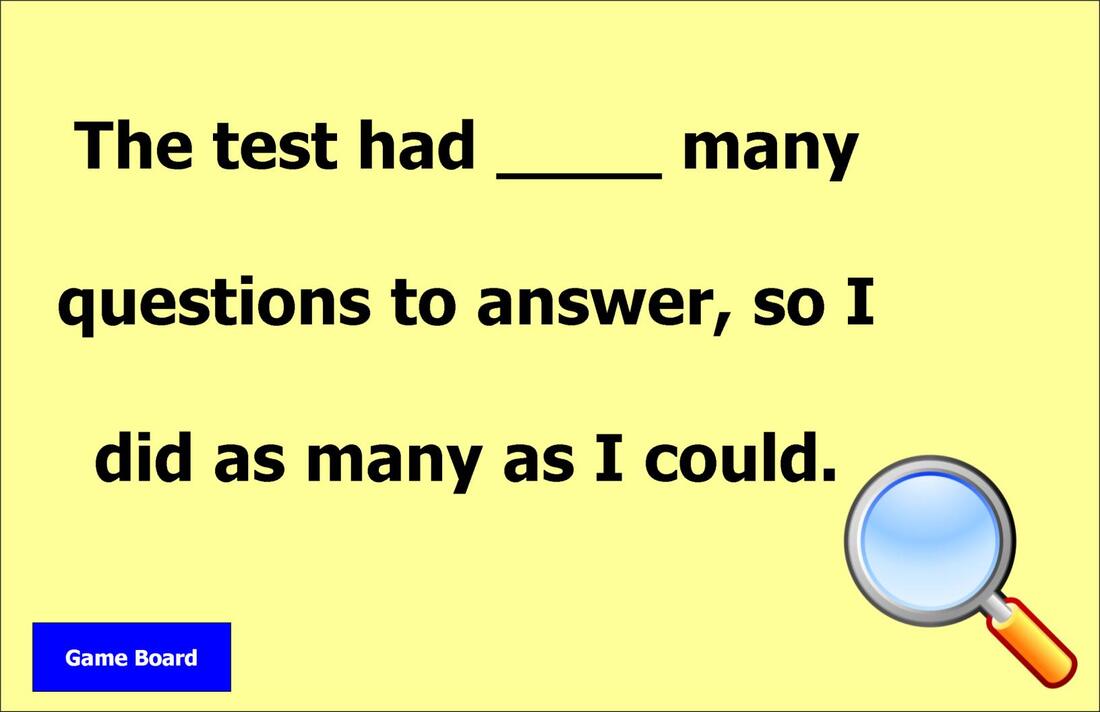
The first part of the process was very similar to other board games I've made. I started by designing the various slides in PowerPoint. In order to make everything fit I like to resize my slides to 17x11 (in PowerPoint click on Design, Slide Size, Custom Slide Size, enter your desired dimensions and cick OK, choose Ensure Fit). This allows me to simply take my already-designed paper game board, save it as an image, and insert it on half the slide. The second half of the slide is where I type instructions for how to play the game. After setting up the game board slide, I then set up a slide for every question. Each question slide includes the sentence prompt and a box called "Game Board." Once all of my slides were designed, I saved them all as images (Save As, choose .jpg or .png, Save, All Slides). In order to have my magic reveal answer I needed to create and save three more images: "too," "enough," and a magnifying glass. For the two text answers (too/enough), I created a text box in PowerPoint, typed the word too, changed the color of the text to be the same as my background, right clicked on it, chose "Save as Image," and saved it. I then repeated the process for enough. The magnifying glass was slightly harder because I am not an artist. I do, however, know of a great source for royalty-free images and clipart, Pixaby. I simply went there, searched for magnifying glass, chose one with a clear background, and saved it to my computer. I was now ready to start setting up my game in Google Slides. First, I needed to upload the game board and sentence slides I designed in PowerPoint and set them as the backgrounds of individual slides. Designing in PowerPoint, saving as images, and setting those images as backgrounds prevents students from accidentally (or accidentally-on-purpose) moving, changing, or deleting things you don't want them to. This process of uploading and setting all these images as backgrounds used to be very tedious and time consuming. Then I was introduced to the add-on Slides Toolbox. This add-on allows me to import images and set them as backgrounds on separate slides in about seven or eight clicks, rather than the seven or eight clicks per slide it used to take. After getting all of my backgrounds in place, I needed to make my Game Board button functional. In order to do this, I drew a rectangle over the button on the first question slide, made the rectangle and border clear, and then hyperlinked it (use the link button in the toolbar) to the slide with my game board. I then copied the box and pasted it onto each question slide. The nice thing about this copy and paste method is that the hyperlink is also copied and pasted and Slides automatically pastes it in the same location on ever slide. So I literally copied it, clicked on the next slide, hit ctrl+v, and clicked the next slide to repeat the process. The entire operation only took me about 30 seconds. It was now time for the part I'd been waiting for: creating the magic reveal. Starting with the first question slide, I inserted the image for the correct answer (too or enough). I then positioned the image over the black line, making sure no part of it covered anything black. Because the word is typed in the same color as the background it became invisible. I then inserted the magnifying glass image that I'd previously saved and set it to go to the back (right click on it, choose "send to back," or click on it and click alt+shift+b). By sending the magnifying glass to the back I told the program that any time it's sharing space with another object on the screen the other object should be on top. In other words, when I drag the magnifying glass over the answer line, the word on the line is put on top, the magnifying glass is put on the bottom, and the word becomes visible because something that is a different color is between it and the background. Very cool! I then went to each question slide and repeated the steps:
The last big task I had to complete was adding the game play script that my husband wrote for me. This script adds a menu item to the top that says "Game Play." Under that menu are additional menus that say "Draw Card" and "Roll Dice." The "Draw Card" menu will randomly jump a player to one of the question cards (similar to drawing a card from the top of a pile). The "Roll Dice" menu will produce a pop up window that says, "You rolled a __," and give a randomly generated number between one and six. This script (as well as others) is available in my store and includes a video giving step-by-step instructions on how to install and use it. All that was left to do now was create the pieces for my students to move. On the game board slide I made a circle, copied it, pasted it three times, recolored them to be four different colors, arranged them where I wanted them, and I was finished. Just a couple of quick tips/reminders for using them in your classroom:
Digital board games take a little bit of work to create (though it is getting easier as I go and learn new tricks, such as Slides Toolbox) and set up, but I really think it's worth it. My students always respond so positively to games and I was very frustrated last semester when I couldn't use them. Now that I have learned how to do all of these cool things I can't wait for on-line instruction this fall! |
I'm moving! Find me at my new home via the button below. If you've previously signed up to receive new post emails, please reenter your email on the new blog.
Categories
All
Archives
January 2021
|