that I have a good variety, and it's really not a difficult task; I just toss them into an old paper box in my basement, rather than the recycle bin. If I'm in need of large quantities of ads, I will visit the local stores shortly before closing time (or in the late evening if it's a 24-hour store) on the day the ad expires. Ask at the service counter and they'll happily give you all they have, or tell you to help yourself from the display, they're going to throw them out in a few hours anyway. You don't get the variety this way, but it does quickly give you a very large quantity. Delicious Descriptions The first activity I want to share with you is one I do with my beginning and low intermediate students. Each student will need a poster board or large sheet of paper (bulletin board paper works, or visit a place where they print newspapers, they'll often sell you an end roll very cheaply), scissors, glue stick, markers, and grocery ads. They may want a ruler as well, but that is optional. Have the students divide their paper into 28 squares (seven rows of four squares each works best). Use the first two squares as the title for the project. In each of the remaining 26 squares write a letter from A-Z. Put the letter in the upper right or left corner, it shouldn't take up much room. Students are now ready to begin work. The first step of the assignment is to find a food that begins with each letter of the alphabet, cut it out, and glue it into the correct square. I allow students to count brand names as the letter for the more difficult to find letters (such as Q and X). Grocery ads are great for beginning learners because all of the foods are labeled, providing them with the needed vocabulary support. The second step of the project is to label each food with it's name and a descriptive adjective. I allow my lower level students to use any adjectives they can think of (but I tell them they can only use an adjective three times in the entire project), such as "red apple." More advanced students are not allowed to use colors or shapes as adjectives, and I challenge them to use alliteration whenever possible (I'll often offer extra credit as an added incentive). Some descriptions are still fairly basic, such as "amazing apples," but others get quite creative, i.e.: "wrinkly pasta" for rotini. Sometimes I'll also challenge more advanced students to write complete sentences for each food, but not too often. The final posters are always very colorful, and make great classroom displays. Other than making everyone hungry, no one has ever complained about this particular activity. As a teacher, I love the rich vocabulary practice, and the built-in support. Cafeteria Cuisine Delicious Descriptions is not challenging enough for my intermediate and advanced students, so they have a different project: Cafeteria Cuisine. The goal of the project is to imagine the school cafeteria as a restaurant and create a menu for it. I provide them with copies of the school's lunch menu for the month and example menus from real restaurants. (Side Note: I actually spent several months asking different restaurant mangers/owners if they'd be willing to give me a real menu, rather than a paper take-out one, that I could use with my students. Almost all of them were more than happy to help, and now I have a nice collection.) You can do this project with just normal paper and markers, but it's much easier on a computer. When I first started doing this project many years ago, we used Microsoft Publisher's tri-fold brochure layout to make our menus. Today I like to use Google's Applied Digital Skills lesson, Create a Brochure, which teaches students how to make a trifold brochure in Google Drawings. This saves me a lot of time because the step-by-step instruction is already done, and the program is much more user friendly. Students are responsible for creating a name, logo, and the menu itself. I tell them their menu must include drinks, sides, mains, and desserts sections. Each item on the menu must have a one to two sentence description, and include a minimum of three adjectives (adjectives can be in the name or description). Other than those few requirements (name, logo, menu with description, at least three adjective for each item), students are free to do whatever they choose. They have a blast and the results are always amazing! I like to share their final products with the cafeteria workers at the school, and they always enjoy seeing what the students have done. At one school we only had two cafeteria employees, a husband and wife team, and they cherished the students' work. When they retired over a decade later the students' menus were some of the things they made sure to take with them. These projects were lifesavers for me when I was teaching multi-level groups! I could teach the same introductory lesson to all of my students, and they could work on their individual projects simultaneously. Those two-four days were a nice break for me, as I was usually trying to do my best imitation of a one room schoolhouse teacher, facilitating up to four unique lessons a class period. Even now, years after those days, my students and I still really like these projects. I hope your students enjoy them as much as mine have. Happy teaching, everyone! Wanting to go beyond basic adjectives? Check out my comparative and superlative adjectives board game, it's available in both paper and digital formats ($1 each):
0 Comments
beginner to low intermediate students about two 45 minute class periods to complete ten sentences (allowing time for students to get materials out, work, and clean up each day).
I tell students to write their names on the back of the pictures (though they don't always listen to that part of the directions), and after I record grades, I put the pictures up in our classroom for everyone to enjoy. While it may not be the prettiest of classroom displays, my administrators have always had positive things to say about the students' work, and are generally impressed at the level of language they are able to produce. My students have always found scavenger hunts to be fun activities, and I am able to check my students' mastery of many skills that would otherwise be relegated to boring worksheet-based assessments. Stay tuned, because on Thursday I'm going to share a similar activity we do with adjectives. Happy teaching, everyone!
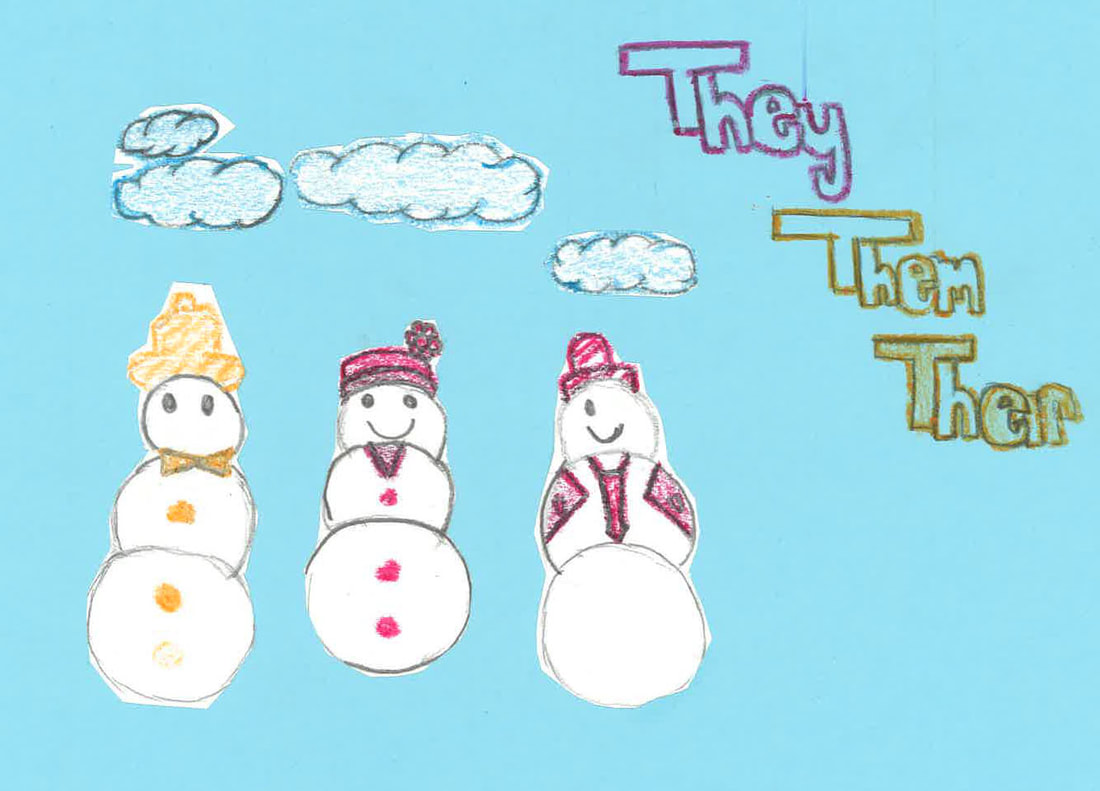
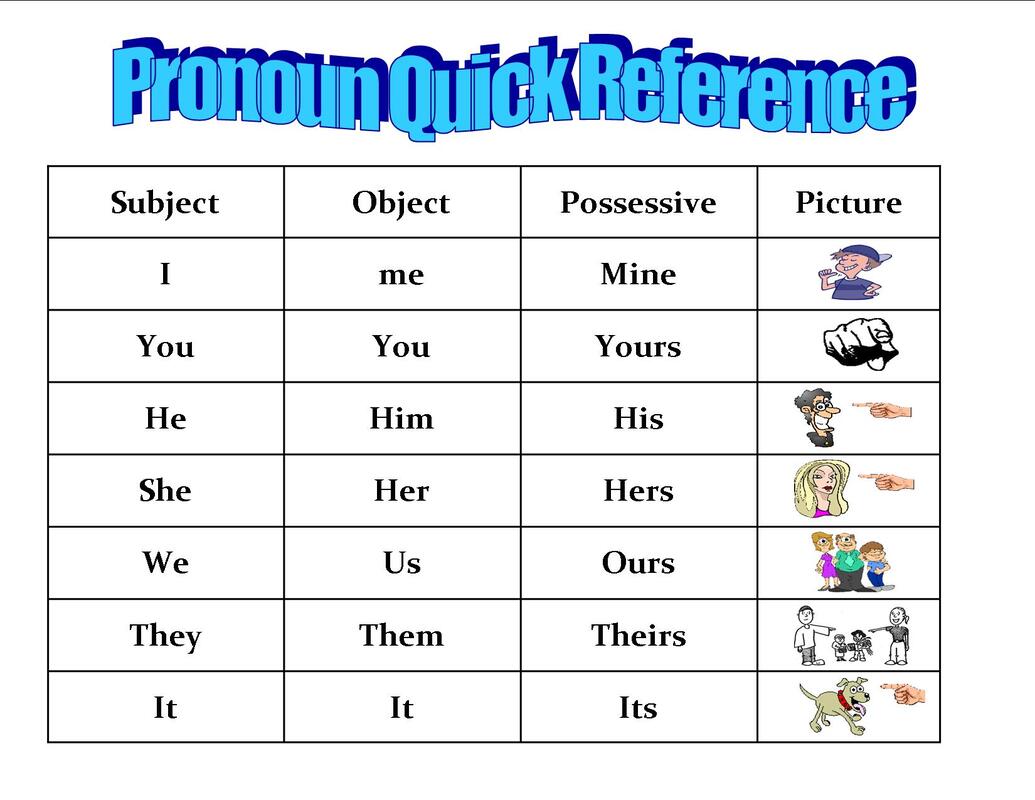
The goal of the activity is to crate a snowperson that represents a pronoun. For example, if a student is assigned the pronoun she, the student would create a snowwoman, rather than a snowman. Depending on how much time we have, I assign each student between one and three pronouns. The students then design and create an artistic representation of the assigned pronoun as a snowperson. Each snowperson must represent the assigned pronoun (I should look like the person who made it), and it must include the subject, object, and possessive forms of the pronoun somewhere. Some students choose to draw, others cut and paste, and still others choose to make a three dimensional project. The entire assignment is very open ended, and the rubric is very simple. Probably the most creative representations are the students who are assigned it. I've had students create snow-dragons, snow-dogs, and even snow-pencils!
I have to be honest, this is one of the activities I really miss doing with students now that I teach at the college level. It's versatile, and I used it with high schoolers, as well as lower elementary students. Due to the short list of requirements (it must represent the pronoun and include all three forms), students are only limited by their creativity and available supplies. It's a fun way to celebrate winter and practice pronouns with beginning level students. Happy teaching, everyone!
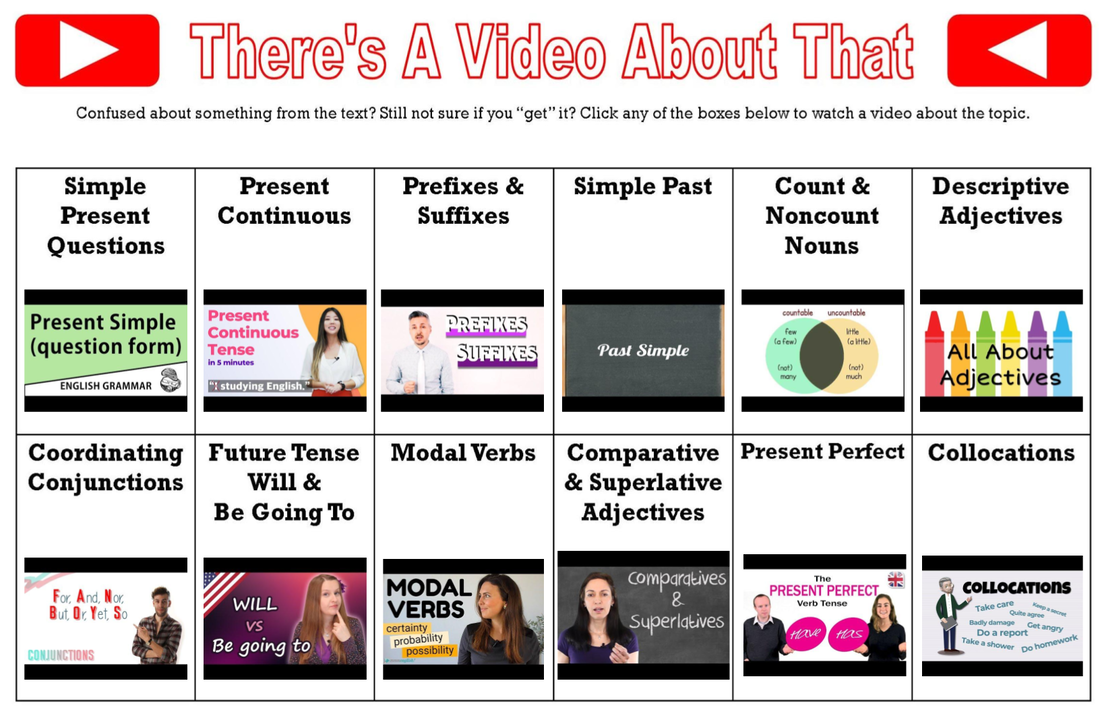
exactly what they sound like. The explanation slides have short explanations for the named grammar topic. The video and practice slides have a YouTube video about the topic and links to various free practice activities on the web.
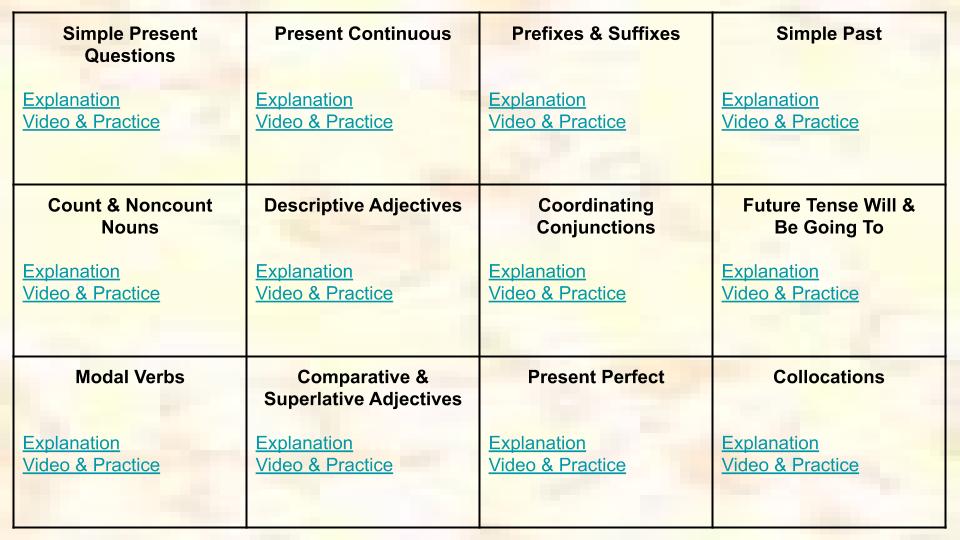
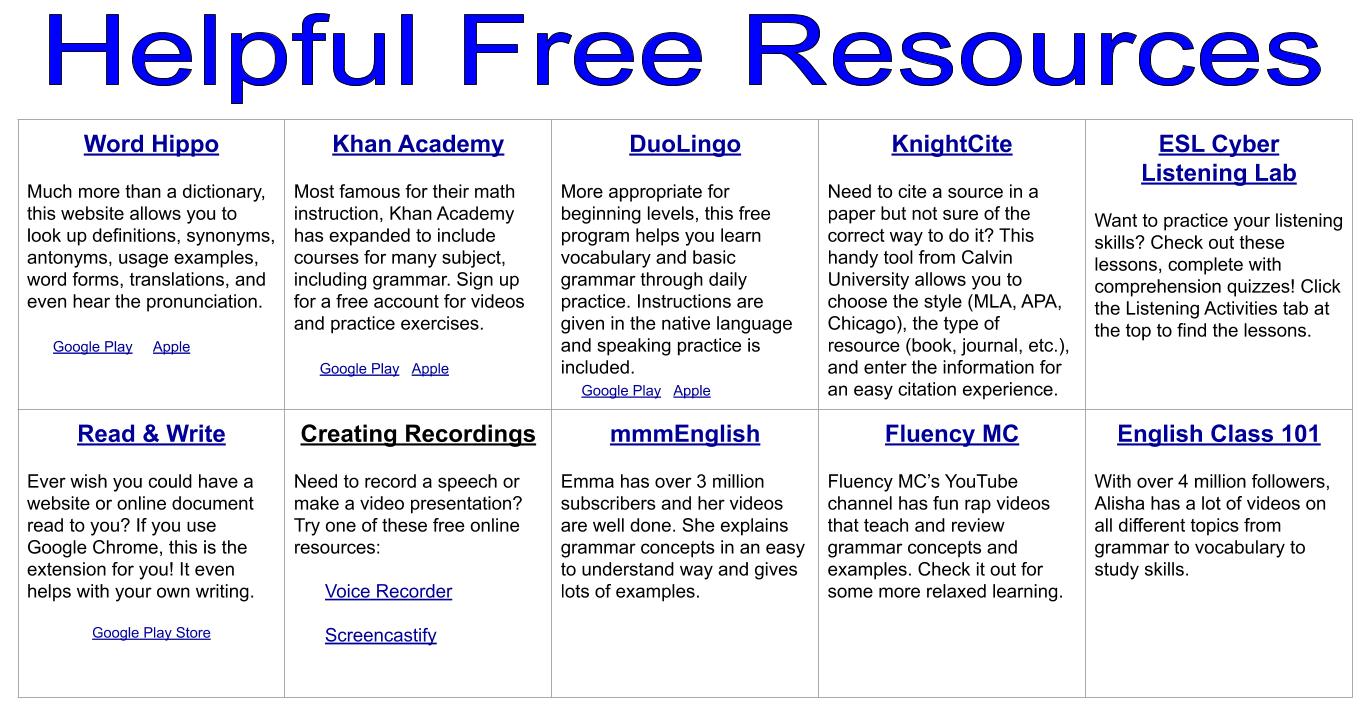
My students mentioned that this menu was very convenient, and they liked having all of the explanations in one place. It also came in very handy at midterm and finals time as I had all of the topics I needed to review with them in one place. There's A Video About That I'm sure we've all heard the phrase, "There's an app for that," at one time or another. And it's likely most, if not all of us, have found a video on YouTube to help us learn something at least once. Inspired by those occurrences in my own life, I created There's A Video About That for our text's grammar topics. The resource is a Google Drawing with a table. Each cell lists a grammar topic and holds a video relating to that topic. To insert the videos into the drawing, I first had to insert them into a Google Slide deck, copy them, and paste them on the Google Drawing. The videos are quite small on the drawing, but after pushing play you can make them full screen. My students again remarked about how convenient it was to be able to find everything they needed in one place. The videos are all different from those in the Review Menu, so students were given yet another explanation of the grammar topic. As teachers we know that different explanations will resonate with different students, and I wanted my students to have several different opportunities to hear the information. The various videos also exposed my students to different accents, something that is important as they are learning. Helpful Free Resources The final resource I am using next semester is the exact same as this semester. Helpful Free Resources is another Google Drawing, this one curating links to free sites students might need. The links include an online dictionary, language explanation and practice sites, listening practice, reading help, YouTube channels, and more. This resource was popular not for the grammar help it offered, but because it helped to narrow the search for what my students needed. Google is great, but trying to choose the best link from a list of millions of hits, in a language that you're not fluent in, is very difficult. This table saves students from trying to find the best site, or getting caught having to pay for something that may or may not be what they need. Hopefully my students next semester will find these resources as helpful as this semester's. All of them are free to download, simply click on the links above (or click on the pictures and buttons at the top left). I hope they are helpful for your students as well. Happy teaching, everyone!
menu (available for free from the original blog post linked above) was based off of seventh grade Common Core Standards and the Core Competencies for the ESL department at the college where I teach. The level one English Skillology menu (also available for free by clicking the picture or this link) is also based off the Core Competencies of our department, but the Common Core Standards come from the third grade ELA set.
Much of the design was the same, and you can read about that in the first blog post. The method worked well for both the students and myself, so I saw no reason to change it. Reusing the basic design allowed me more time to focus on the activities themselves, and I think there's a good mix of skills represented. Here's a quick overview of the 20 activities: Reading
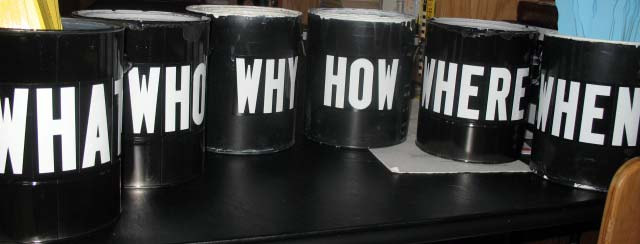
person has returned to the team, player two takes a stick and repeats the process. Play continues until all of the sticks have been placed in cans. I then quickly check the sticks in each can, giving teams one point for each correct placement (thus the different color sets of sticks). The winning team is the team who finished the fastest (I give three points to first place, two points to second, and one point to third) and most accurate (it happens fairly often that the slowest team actually wins the game due to increased accuracy).
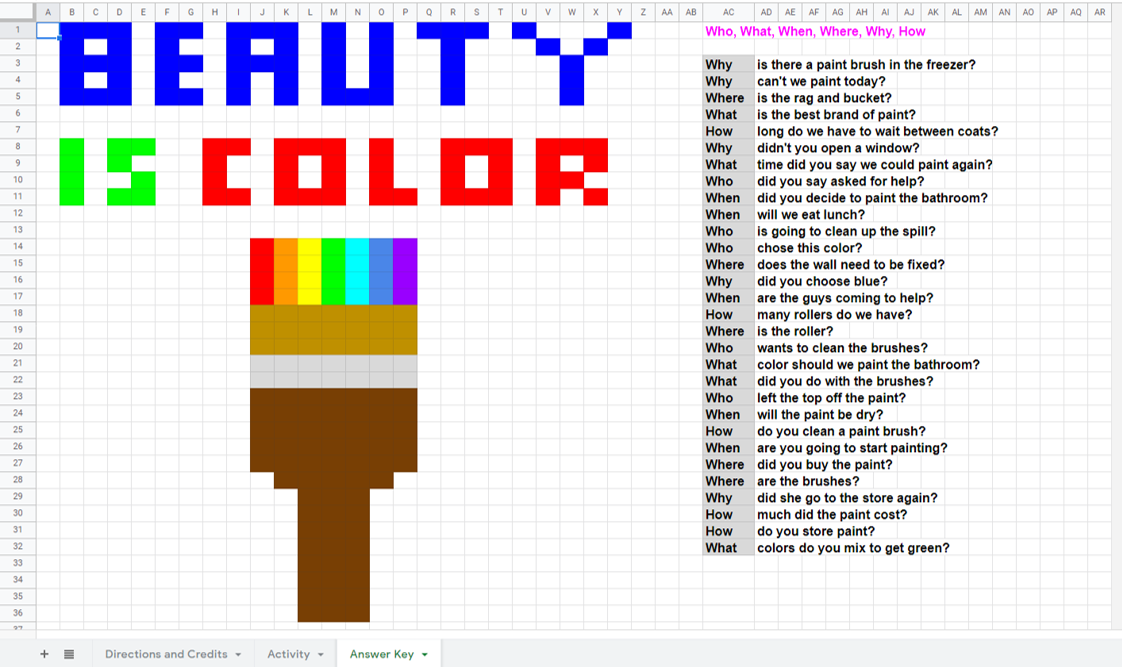
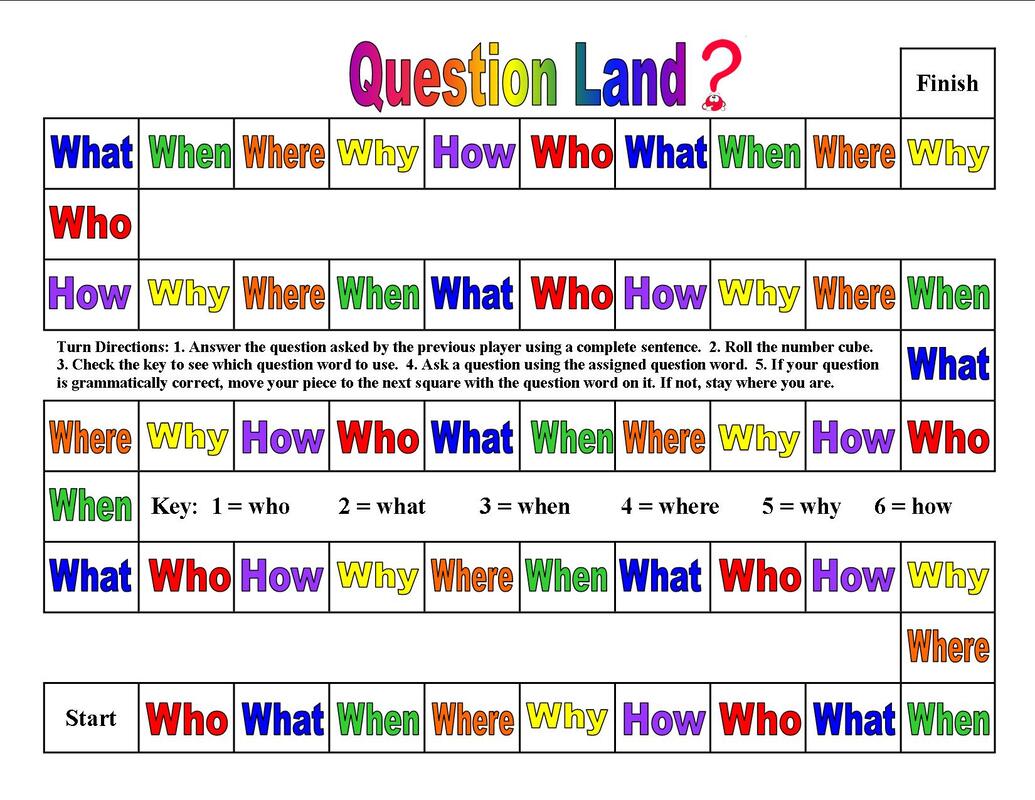
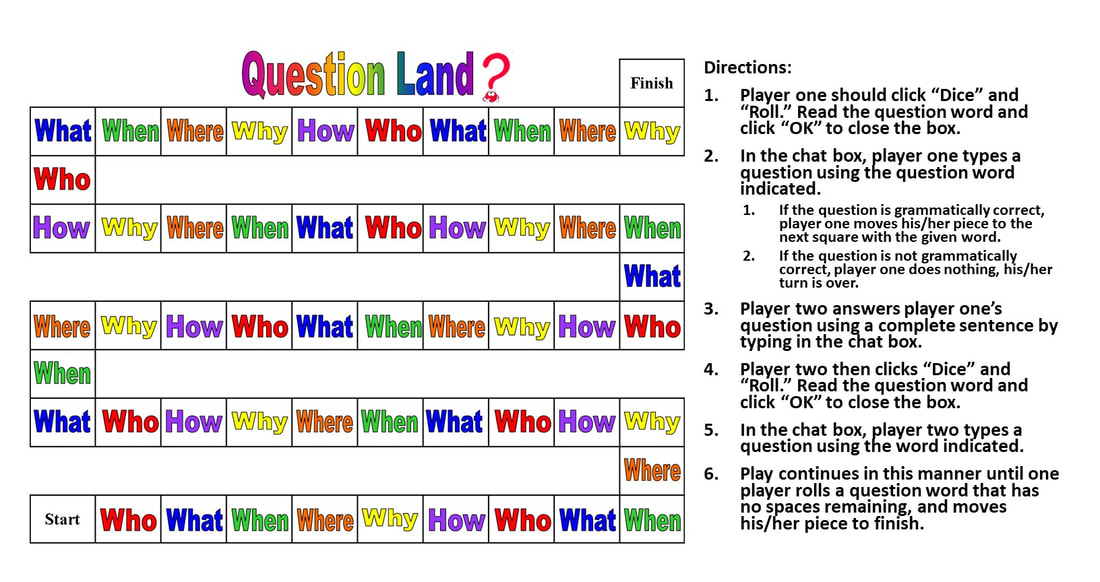
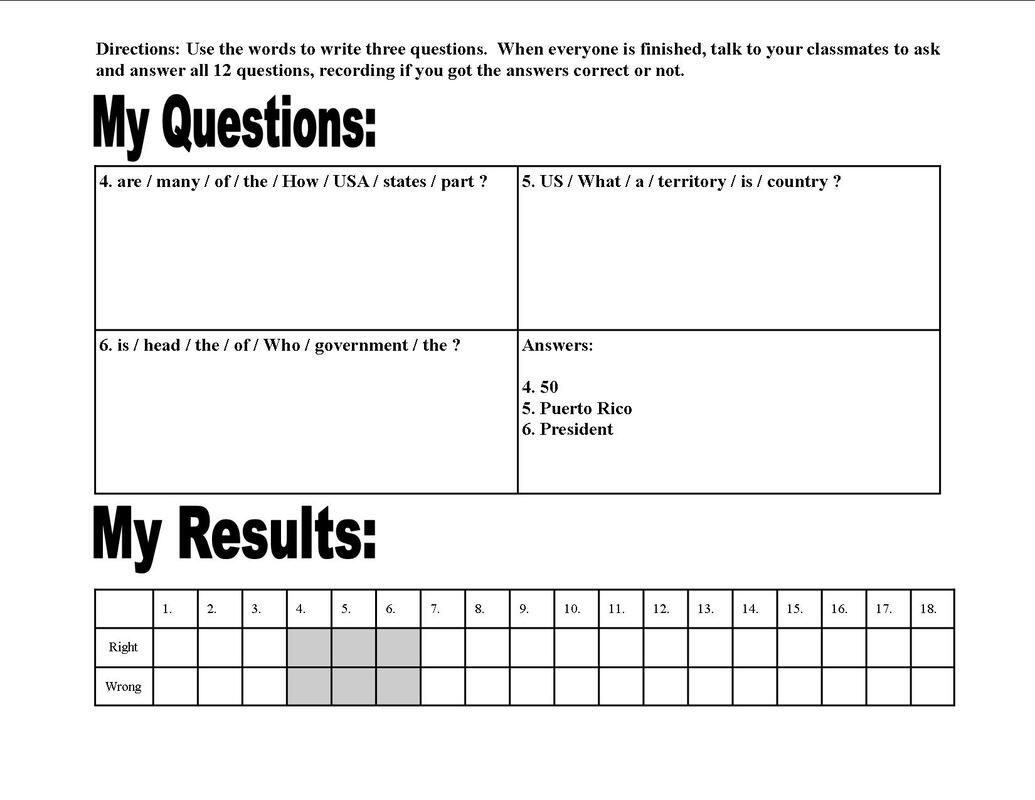
Students love paint can questions, and usually beg to play again, and I almost always give in to them. This semester, and it's looking more and more like next as well, we are fully virtual. I enjoy the game as much as the students, so I really wanted to find some way to use it digitally. I considered a lot of options, including digital task cards, self-grading digital task cards, and even another cover up or board game, but really wanted something special for this activity. I finally settled on creating another mystery pixel art activity. I used the same questions as the paint can game, and themed the picture around color and painting (see image above). You can get either the Google Sheets or Microsoft Excel version of the mystery picture by clicking the picture and button above, or the links earlier in this sentence. Once we have worn ourselves out running back and forth, I like to play one more board game to practice asking and answering questions. Question Land is a game that is very loosely based on Candy Land. In the paper version students roll a number cube to see what question word they will use (the numbers and words are on the game board for easy reference). In the digital version, they use a specially scripted "Dice" menu to "roll" a question word. After discovering which question word a player will use, game play is the same for both versions. The student first answers the question asked by the previous player with a complete sentence. Then he/she asks a question of his/her own, using the word indicated. If the question is grammatically correct, the player moves his/her piece to the next square containing the question word he/she used. If the question was not grammatically correct, he/she stays in place. The first player to reach finish is the winner. The finally activity we use in our unit is another free download from my Teacher Pay Teachers store. Questions and Answers is a writing and speaking activity for up to six students (if you have more students simply make more copies of each page). Each page has three different questions with the words mixed up. In a separate square are the answers to the questions. Students must unscramble the questions and write them correctly in the provided space. Once students have all had a chance to unscramble and write their questions, they walk around the room, talking to one another. After finding a partner, they take turns asking and answering questions. At the bottom of each page is a place to mark if they were able to answer their partners' questions correctly or not. After students have asked their questions of five others, and answered the remaining 15 questions in the activity, they return to their seats. They count up how many questions they were able to answer correctly (all of the questions relate to USA history), and the student with the most correct answers is declared a winner. As stated before, you can download this activity for free by clicking the picture above, or the Questions and Answers links in this paragraph. By the time we finish all of these games and activities students have a good grasp on question words and how to use them. If you're looking for a quick way to grab most of these activities (you'll have to make your own beach ball and paint can set), you can use the buttons at the bottom of this post. Three different discounted bundles are available: paper activities only, digital activities only, and paper + digital activities. Happy teaching, everyone!
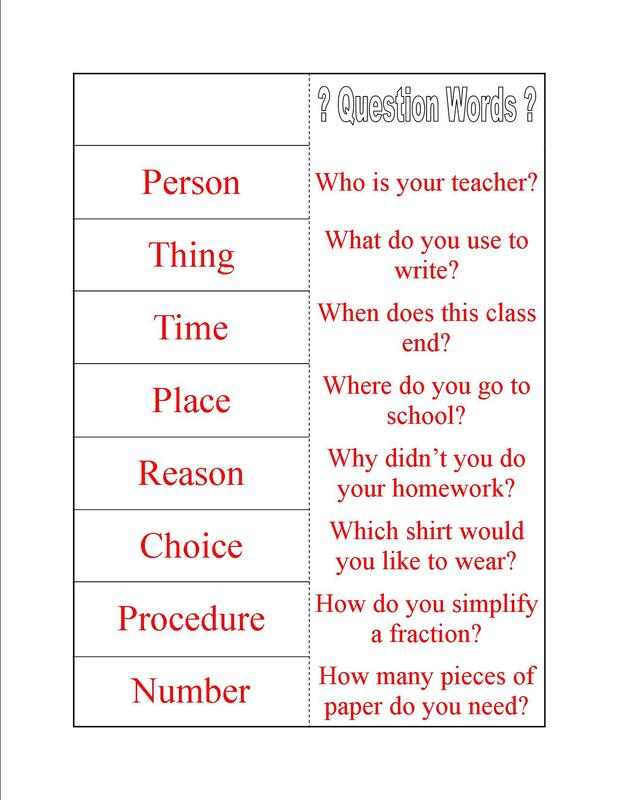
vocabulary to the definition, picture, answer, or anything else I chose to put on the other side. My question words match up card set has three different cards. The first card asks the students to match the wh– word with the type of answer it elicits and a picture. The second card asks students to match the wh– word with the correct question (there is a blank line instead of the wh– word). The third card asks students to match the wh– word with a short answer. Again, since we are virtual this semester (and it's looking more and more like next semester will be as well), I created a digital version of the match up cards. The digital version does not require the boards, but all of the matching items are the same. Rather than using rubber bands to indicate their matches, students stretch provided lines from one side to the other.
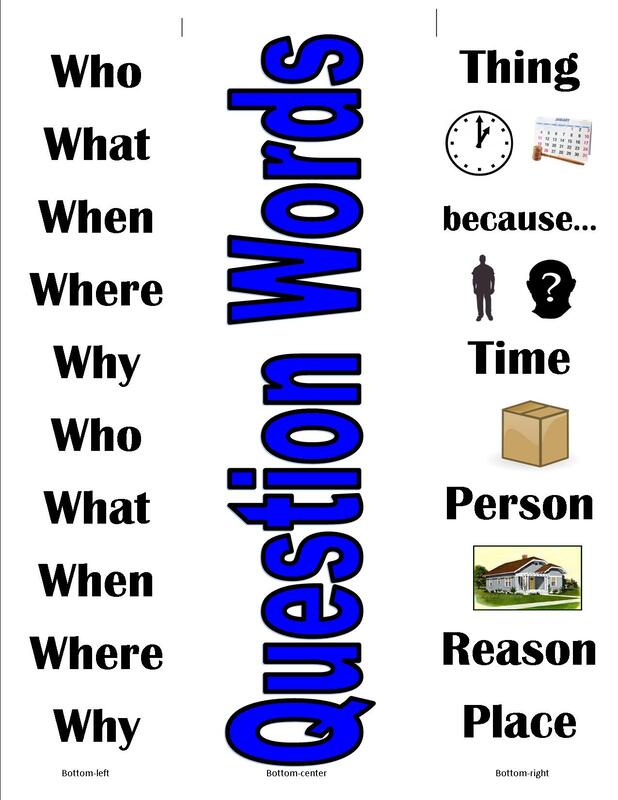
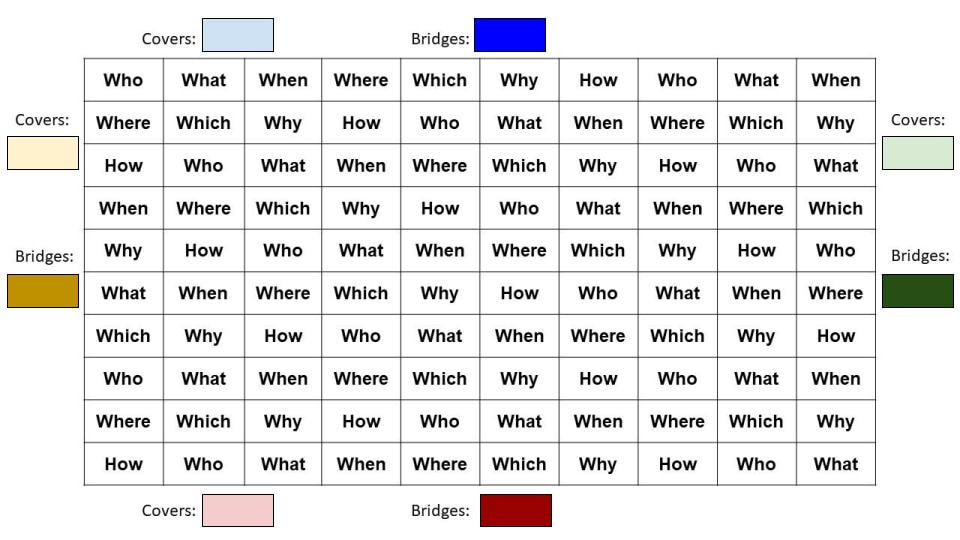
Once students have gotten relatively familiar with the question words and the answers they each produce, it's time for our first game. Beach Ball Questions is one of my students' favorite games to play, I think because they get to throw a ball around the classroom. All that is required to prep this game is a beach ball and a Sharpie marker. Blow up the ball and use the marker to write a question word in huge letters, one for each section of the ball. Allow the writing to dry, deflate, take to school, reinflate, and you are ready to play. Students gather in a circle and I start the game by tossing the ball in the air and catching it with two hands. Using whatever question word my right thumb is on, I ask a question before tossing the ball to another player. The person who catches the ball must first use a complete sentence to answer my question, then he/she asks a new question that begins with whatever word his/her right thumb is on. Play continues in this manner for as long or short as you like. I encourage students to not repeat questions, and sometimes I will help them think of one if they can't come up with something new. During our question word unit I keep the beach ball at school, and whenever we have an extra couple minutes at the end of class I'll grab it and we'll play for awhile. It's a great way to get out of our seats and practice our speaking and listening skills, as well as our question word vocabulary. The second practice game we like to play (which you can download for free using the links above or in this paragraph) is Escape! The Question Grid. The goal of this game is to move from one side of the grid to the other by asking and answering questions. Students choose one side of the grid (one student per side), and any question word on that side, from which to start. On a student's turn, he/she answers the question asked by the previous student, indicates which square he/she would like to claim (it must have at least one side touching a square which already belongs to the student), and asks a question using the word in the square. If the question is grammatically correct, the student uses his/her dry erase marker to color in the square on the laminated grid. The next player then takes his/her turn. Play continues until one student reaches the opposite side and escapes the grid. A digital version of Escape! The Question Grid is also available. In the digital version students must type their questions onto the provided rectangles, and then drag and drop the rectangle onto the square they are claiming. There is also a variant of the game that includes bridges. The bridges, limited to five per player, can be used to cross over a square previously claimed by an opponent. In order to deploy a bridge, a student must type a complete sentence answer to the question posed on the cover of the square he/she wishes to cross over. The use of the bridge constitutes the player's turn, but does open up more spaces for him/her to claim in the future. Though this game takes a bit more prep work than Beach Ball Questions, and can't be as easily used as a time filler at the end of a lesson, it is still a very fun practice game. I especially like it because we can play it over and over again since the questions and answers change every time. As I said in the beginning, these are only the resources, activities, and games I use in the initial stages of my question words unit. On Thursday I'll share some of the more advanced activities and games we use, including a couple more free ones. Happy teaching, everyone!
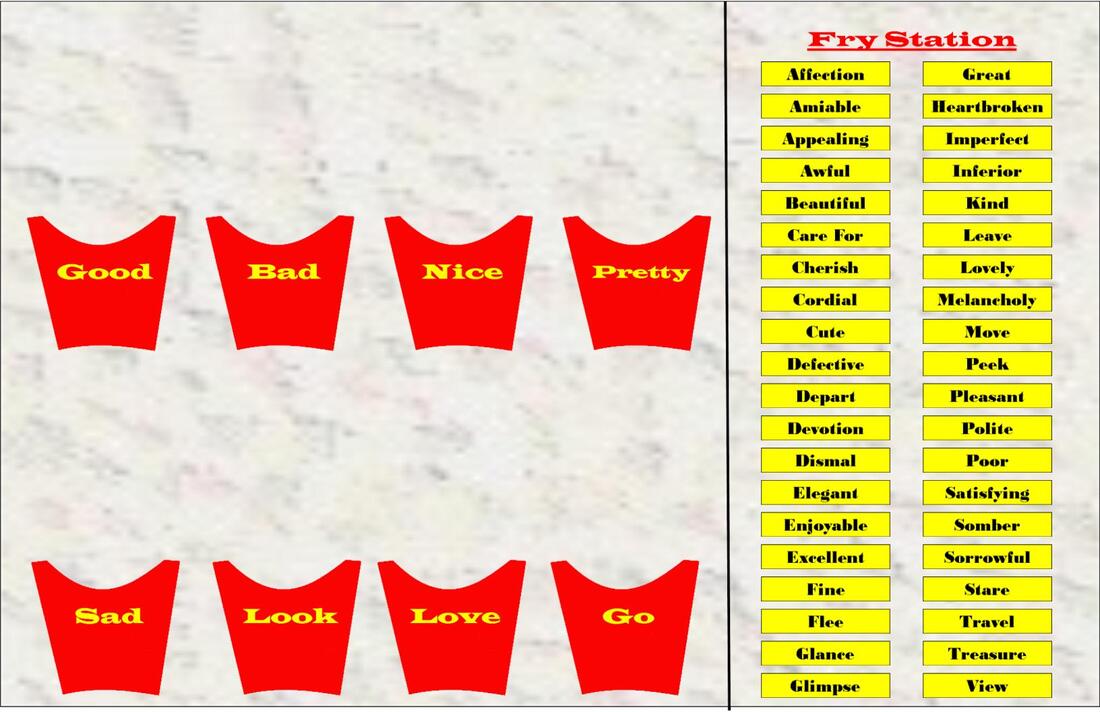
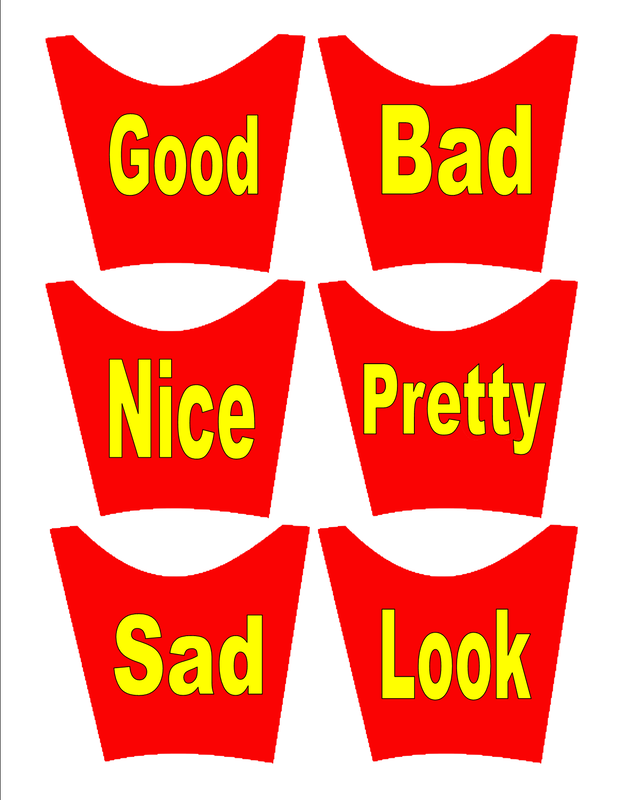
are on fry boxes, and the synonyms are on rectangles that I print on yellow cardstock to make the fries. The students must sort the fries onto the correct boxes, five fries per box, and be prepared to explain why they placed each fry where they did. Since some of the synonyms (such as dismal which can be sad or bad) could be matched with more than one word, it is the ability to defend their choices that takes this activity to the next level.
I am fully on line this semester, but I didn't want to forego this particular activity. My adult students especially appreciate it because so many of these synonyms are words they've never heard before. This prompted me to create a digital drag and drop version of French Fry Synonyms. Drag and drop activities are very easy to create, and my students have really enjoyed doing them. When creating a drag and drop activity, the first thing you need to do is decide what will be stationary and what won't. You want to create all of your stationary items, and then convert them into background images. Making all stationary items part of the background protects them from being accidentally moved, edited, or deleted. I prefer to do this in PowerPoint, in fact I do almost everything in PowerPoint. When I open PowerPoint, the first thing I do is adjust the size of the slide. You can do this by clicking on Design and Slide Size at the top. I vary my slide sizes for the different activities, but for this one I chose 17" x 11". PowerPoint will then ask if you want maximize or ensure fit of your slide elements. Since this is the first thing I do, it doesn't matter which I choose, but I always choose ensure fit, just so I'm in the habit if I ever change the size of a slide I've already designed. The second step in my drag and drop creation practice is to choose a background. You can find the Format Background option in the Design menu, or by right clicking on the slide and choosing Format Background from the menu that appears. I recommend that you choose something simple and not distracting. For this particular activity I chose a marbled look from my personal collection of pretextured backgrounds, hoping to create the illusion of a kitchen countertop. Often I will use the transparency slide in the Format Background menu to lighten the background. This helps my text and other elements to stand out a bit more. The final step is to click Apply to All at the bottom of the Format Background menu. Now the fun begins with the designing of the non-moving elements. For French Fry Synonyms I wanted a section with the fry boxes and a separate fry station (place for my fries that needed to be sorted). I also knew that I needed room above each fry box for students to place the synonym fries, so I decided to divide my sixteen overused words onto two slides. The fry station was easy to create, all I had to do was draw a straight line from top to bottom and add the text "Fry Station" at the top. To create the fry boxes, I searched Pixaby (great source for royalty-free, commercial use, no attribution required images) for fry boxes, and chose one that was simple. In order to remove the fries in the original drawing, I inserted the image into Photoshop, selected the inside of the fry box, reversed my selection, and hit delete. I was then able to fill the box with a red color, and save it as a .jpeg. Back in PowerPoint, I inserted the now empty red fry box, resized it, added a text box, and typed my first overused word. I was then able to copy and paste the box seven more times, move them around the slide, and change the word on each. To create my second slide, I opened the Insert menu, clicked New Slide, Duplicate Selected Slides. After changing the words one each fry box, I was finished. In order to covert my slides to images, I opened the File menu and clicked Save As. After choosing where I wanted the file saved, I changed the file type to .jpeg, clicked save, and chose All Slides. This created a new folder in my selected location, with a .jpeg file of each slide. The fries would ultimately be moveable elements of my activity, but I didn't want students to be able to edit (either by accident or on purpose) the synonym typed on each. In order to prevent this, I needed to create each fry as a separate image, one I'd be able to insert onto my final activity slides. Still in PowerPoint, I selected the Insert menu again, Shapes, and chose the rectangle shape tool. In my fry station (though it doesn't matter where you do this), I drew a rectangle, changed the color to yellow, double clicked inside it to add text, and typed my first synonym. After formatting the text and resizing to my liking, I copied and pasted the fry 39 times (eight fry boxes, five synonym fries per box, 40 fries total). I then went through and changed the synonym on each fry. To get my fries for the next slide, I selected all of the fries, copied them, and pasted them onto slide two. After changing the synonym on each again, I was done creating synonym fries. The final step was to save them as images by right clicking on each fry, choosing Save as Image, and giving it a name. I like to name my draggable elements by whatever word is on them so they are automatically alphabetized for me in my file. This helps later because when I insert the images onto the final slide they are inserted in alphabetical order, saving me the trouble of tying to figure out how to arrange them in "random" order. In this instance, since I have two different sets of draggable images, I added a 2 to the front of the second set so I could quickly tell each set apart. After all of this, it was finally time to create the final activity slides. I opened my Google Drive and created a new Slides file. Step one, as before, was to resize the slide by clicking File, Page Set Up, Custom. I then entered the same dimensions as before (17"x11"), and clicked Apply. It is very important to do this first so your background images (the unmovable parts of your activity) don't get distorted when you import them. When importing the unmovable background images, you can do it several ways. If you only have a couple of slides in the activity (such as with this activity), you can insert the background by right clicking on the slide, choosing Change Background, Choose Image, Browse, navigate to and select your image, Open, Done. You will need to repeat these steps for each slide. If you have a lot of slides (as I've had in other activities such as Too or Enough? or Context Clues Connect Four), I recommend using the Add-on Slides Toolbox. This Add-on allows you to import multiple images at a time, and set them as backgrounds on individual slides, with just a few clicks. It was a huge time saver for me! It is now time to insert the movable elements. To do this, click Insert, Image, Upload from Computer. You can then insert as many images as you like. If an image needs cropped (sometimes clear space will be added around the edges), simply triple click on it and use the black bars to move the edges in and out. Once all of the images have been cropped, select them all (ctrl+a), and create a single pile by clicking Arrange, Align, Center, Arrange, Align, Middle. Once all of the images are in a single pile, you can adjust the size by dragging the blue boxes. If you want to maintain your proportions, try holding down the shift key while you drag the corner boxes. You can also set the size manually by clicking Format, Format Options, and typing in the exact dimensions you would like. Once all of the pieces have been sized to your liking, arrange them in your holding area (fry station in this case). Your work will be automatically saved in your Google Drive. All that remains is to assign the activity to your students and let the fun begin! There are many ways to do this, and many of the specifics will depend on your LMS. When I did this activity with my adults last week, I copied and pasted the two activity slides enough times so each student would have his or her own set. I then put names on each slide so no one would be confused as to which slides were assigned to which student. Finally, I shared the deck with my students (giving them editing rights), and we all dived in. As the students worked on their individual slides, I moved from slide to slide, checking answers. If a fry was placed on the correct box, I drew a smiley face next to it. If a fry was not placed correctly, I either moved it back to the fry station (for obviously wrong answers, such as colossal for little), or asked the student for an explanation. Not all of my students have microphones that work well, so we like to use the built-in chat feature to communicate. If the student could give a defense of his/her choice that made sense, I added a smiley face; if not, the fry was returned to the fry station for resorting. They loved it, and as is typical for my adult students, they wanted to be sure they'd continue to have access to the activity so they could write all the words down for further study. There are many other ways to create and use drag and drop activities, but this is the method that works for me. My students really do enjoy them, and are very engaged while completing them. Besides in class activities, such as this one, I've also assigned them as homework, and provided some for extra practice. I hope you and your students will enjoy them as much as we do. Happy teaching, everyone!
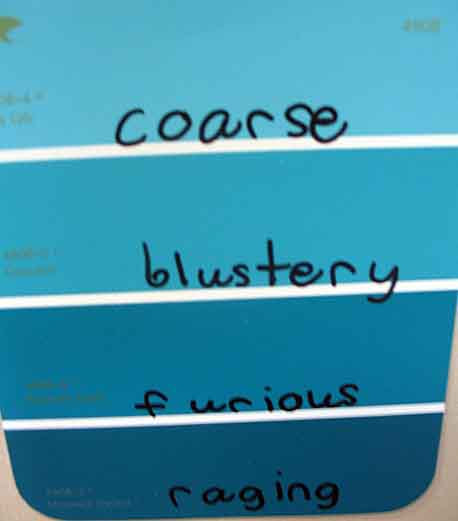
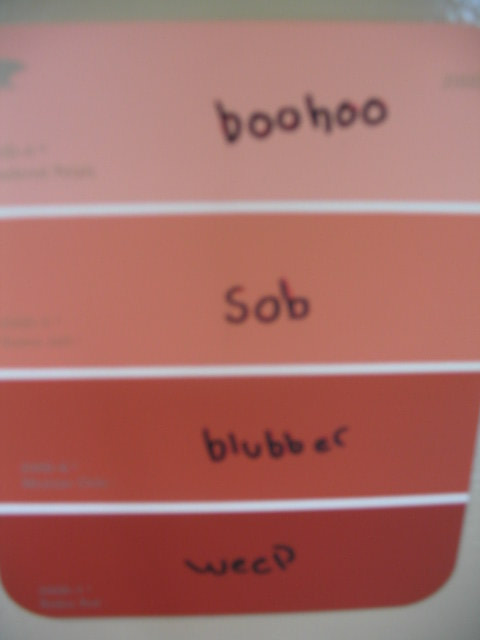
the way they did. Once they have successfully ordered their words, and explained their reasoning, students then write the words (one per shade) on the paint chips, placing the weakest word in the lightest shade.
I like this project because it helps students understand that language can be very precise, as well as descriptive. The requirement to explain their reasoning behind the ordering of the words always leads to some interesting discussions, and more than once a student has put words into an order I initially disagreed with, but they made a convincing argument that won me over. I also like how they have to really dig into the synonyms, not just copy them from the thesaurus. You can't successfully rank words by strength, and defend your choices, without knowing what each individual word means, and how it differs in meaning from the other synonyms. Ultimately students end up considering the synonyms' definitions and example sentences, as well as other factors when making their choices. Ultimately this quick (the entire process takes one class period or less) activity produces a lot of learning!
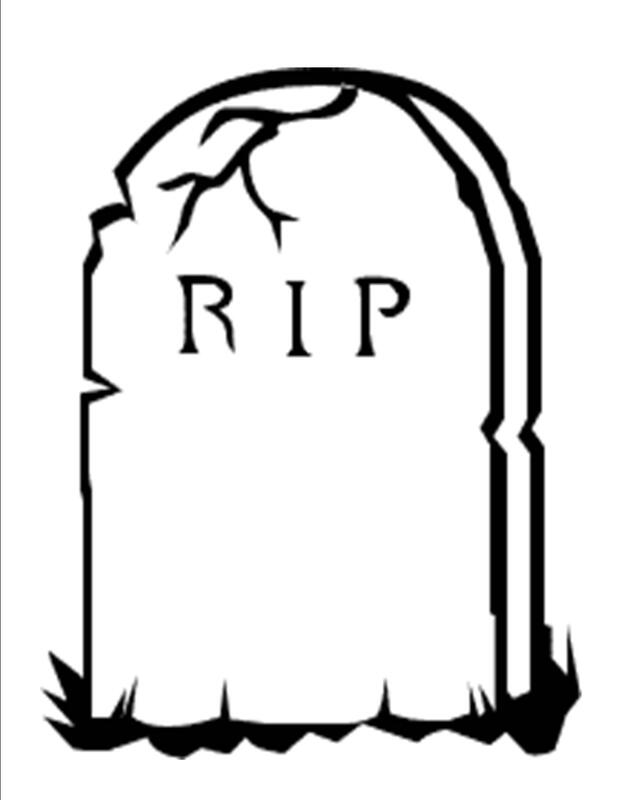
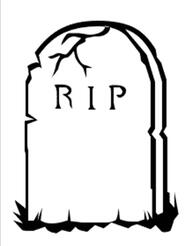
Each student received a different graphic organizer (a total of eight words were represented). After completing the graphic organizer they were able to use it as payment for a tombstone and ghosts. In groups (based on the word from their organizer) the students designed the tombstone listing the overused word as the name and the part of speech as the relationship. They then listed one synonym on each ghost (a minimum of three was required) and decorated those as well. Everything was eventually combined into one bulletin board under the title of "Word Cemetery Where Dead Words Rise As Synonyms." The students loved it and actually started using some of the synonyms on occasion! Administration thought it was great too and specifically commented on how clever it was after a walk through. This year our October celebrations are online so I wanted to develop a digital version of the activity. I decided to use one of my favorite programs: Google Slides. The basic concept is still the same and slide four (pictured above) has the eight tombstones, along with an example and a supply of ghosts already provided. The example and tombstones themselves are in the background, and thus protected for accidental (or not-so-accidental) editing. The graphic organizers appear on the following slides, one for each word, and are also in the background, with textboxes supplied for student notes. One of the things that most excited me about this project was it gave me a chance to create my first "infinity" draw piles. I'd seen other digital activity descriptions refer to them, but hadn't really thought about their creation. It turned out to be remarkably simple, one of those "Duh!" moments that I seem to be having so often these days. I simply chose my ghost (once again I was able to find the royalty free clipart I needed on Pixaby), added a text box, grouped the two together, and copied/pasted it about 20 times. I then selected all of the ghosts (easier for the first set since I could simply click ctrl+A), right clicked on them, chose align vertically-middle, align horizontally-center, and they had all moved into a single pile. I repeated the process with the second ghost (because I just had to have two different ghosts), and I had two "infinity" piles of ghosts students could drag and drop. Of course the piles aren't truly never ending, but since students were only required to do three synonyms per dead word (meaning a total of 24 synonyms), and there are about 40 ghosts in total, the chances of them running out are slim. If your students are over achievers, and you fear them running out, simply paste a few more ghosts onto the slide before aligning them into a single pile. You can get both of these activities for yourself by clicking on the pictures above. As I said, my students found the process to be a lot of fun and it was a great addition to our October festivities. Happy teaching everyone! Want more synonym fun? Check out my French Fry Synonyms Sorts!
|
I'm moving! Find me at my new home via the button below. If you've previously signed up to receive new post emails, please reenter your email on the new blog.
Categories
All
Archives
January 2021
|