The set up of this activity is slightly more involved than Mr. Potato Head, but not much, and the storage is a lot easier! You will need 4-6 pictures (depending on how many students you want in a group) of different subjects. I have a set of about 12 that I've found over the years, printed on full-size sheets of paper, and laminated. I found most of them by looking at the results of various Google image searches and saving what caught my eye. Since I wasn't selling or distributing them in any way I wasn't too concerned about copyright (I told students the images weren't mine), but if you're looking to find royalty free images that are marked for reuse, Pixaby is always my go-to option. I've also used postcards at times, but find they are a little smaller than students like, and more difficult to see. You will also need several large sheets of paper, one for each image in each group. In the past I've varied between using pieces of bulletin board paper taped to the wall, and sheets of ledger size paper placed on tables. I think easel pads would also work well, but never had one to try it out. The final thing you'll need is a different color marker for each student in the group. Once you have your supplies, create your stations by placing a large piece of paper and an image at various locations around the room. You want to give students enough room to work, but not spread out too much because you'll have more than one group working at a time.
Students complete the activity by choosing a marker and a photo to start with. A timer is set (I always used one on my smart board or my phone) and students are given 60 seconds to write down as many descriptive words and phrases as possible for their photos. Once time is called, students all move one photo over (taking their markers with them), and start again. For the second, and all following rounds, I give students 90 seconds because they first have to read what those before them wrote. They are told to not repeat what other students have said. I encourage students to try to write at least 3-5 things for each photo. We continue rotating and writing until students have viewed and wrote notes about each photo. Students then return to their original photo and read over the descriptive words and phrases their classmates wrote. If there are any questions, or words they don't know/can't read, they are given time to consult with their group members. They then use the words and phrases from the brainstorming paper to help them compose a descriptive paragraph for the photo. I tell students that they don't have to use all of the suggestions, but to try and use as many as possible. I also encourage them to make inferences about the events of, before, and after the picture in order to create a descriptive narrative, rather than just a paragraph about what they can see. Since remote learning and social distancing have become the norm for this year, I needed to tweak this activity. I chose to make it digital by creating a Google Slides deck for each group. I chose Slides because it is familiar to my students, but I can easily see this working with Jamboard, Padlet, and a host of other apps as well. The first slide of the deck has directions for the students (basically the same as described above, but I give 90 seconds for all rounds to keep things even and give students time to remember how to work the digital components). Slides 2-6 are the brainstorming slides. On each slide is a photo (most from Pixaby), "infinite" piles of digital sticky notes in five different colors, a 90 second timer (YouTube video), and a button that links to the paragraph slide for later. To make the "infinite" piles I used the shape tool to draw my sticky note, changed its color, formatted the text, copied and pasted it about 30 times, selected all of the shapes, aligned them to the middle, and then aligned them to the center. I then dragged the entire pile to the location I wanted it, copied and pasted the entire pile, changed the color of the new pile, and dragged it to where I wanted the second pile to be. I continued pasting, changing the color, and dragging the piles until I had five. Slides 7-11 have the pictures repeated, a text box for the paragraphs, and a button that links back to the corresponding brainstorming page. The hyperlinked "Paragraph" and "Notes" buttons allow students to quickly jump between the brainstorming and corresponding paragraph slides as they write. Once I had my slides set up, all that was left to do was share it with the students. I made a copy for each group, and shared the appropriate copy with all group members receiving editing rights. Students were then able to complete the activity in real time from wherever they were. I can also assign them the activity in stages, giving brainstorming an earlier due date than the paragraph, for asynchronous learning. Describe That Picture! really is a fun activity, and I always enjoy seeing what the students come up with! You can get the Google Slides deck for free by using one of the links in this blog, or the button below. You can also get the free five senses poster I hang in my classroom, and more descriptive writing activity ideas via the same methods. Happy teaching, everyone!
0 Comments
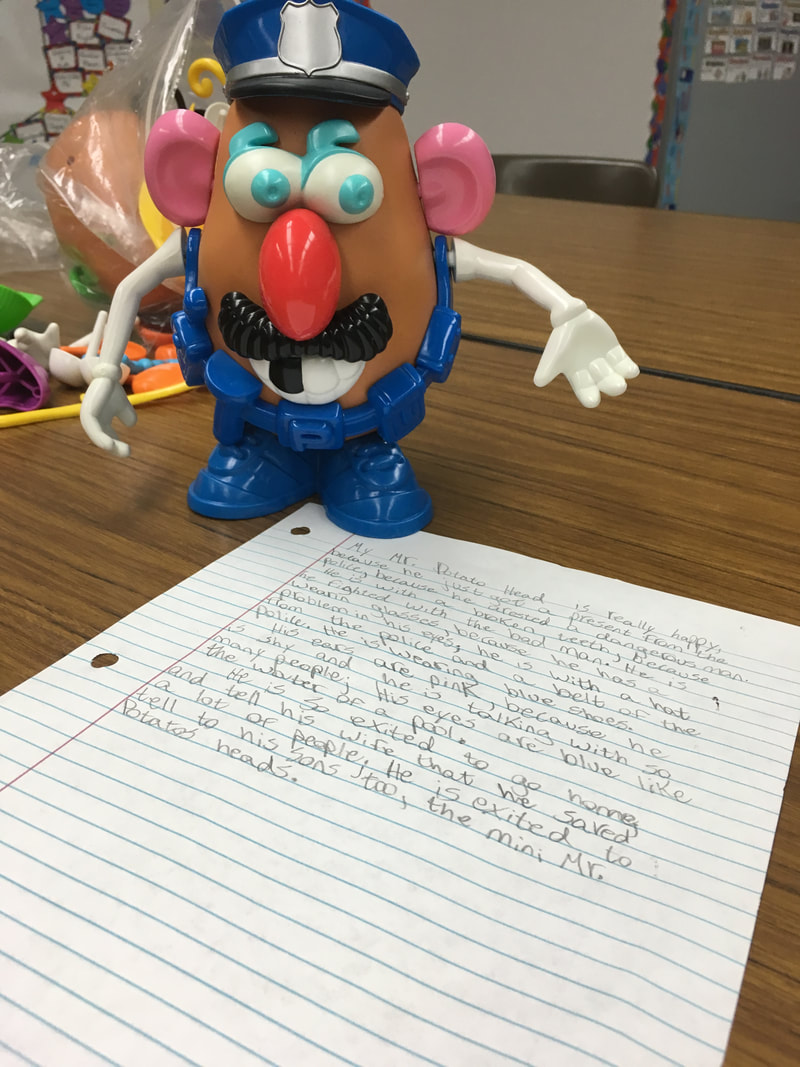
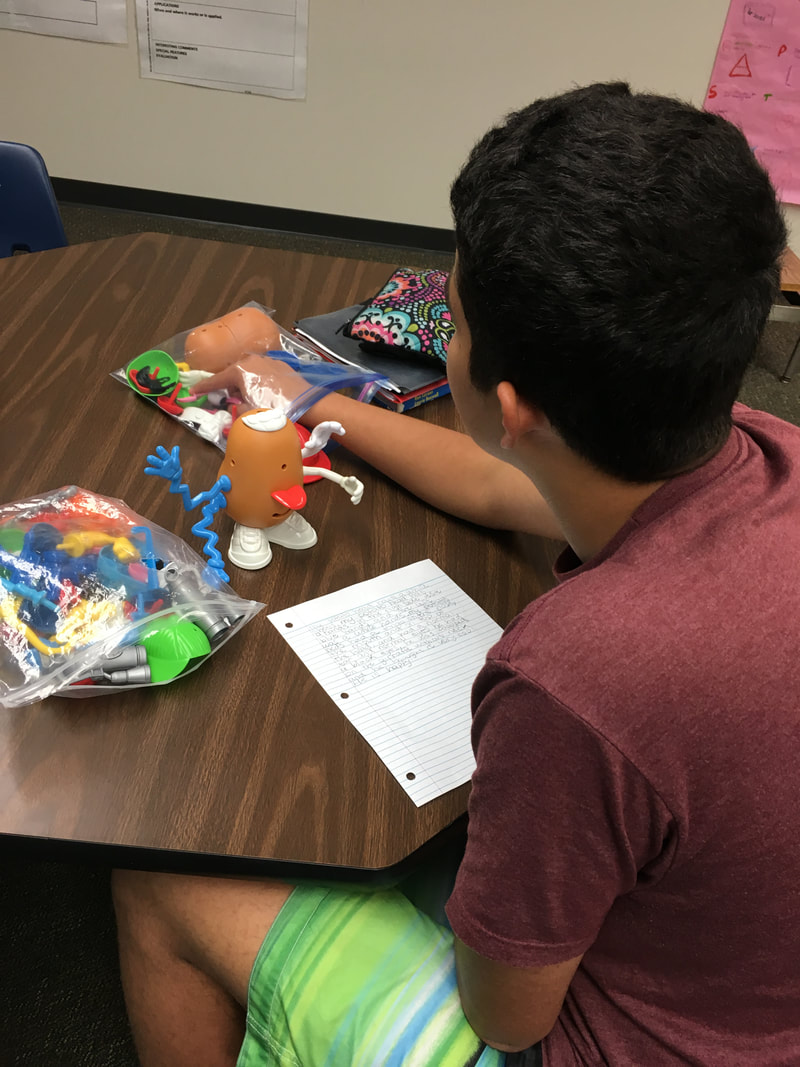
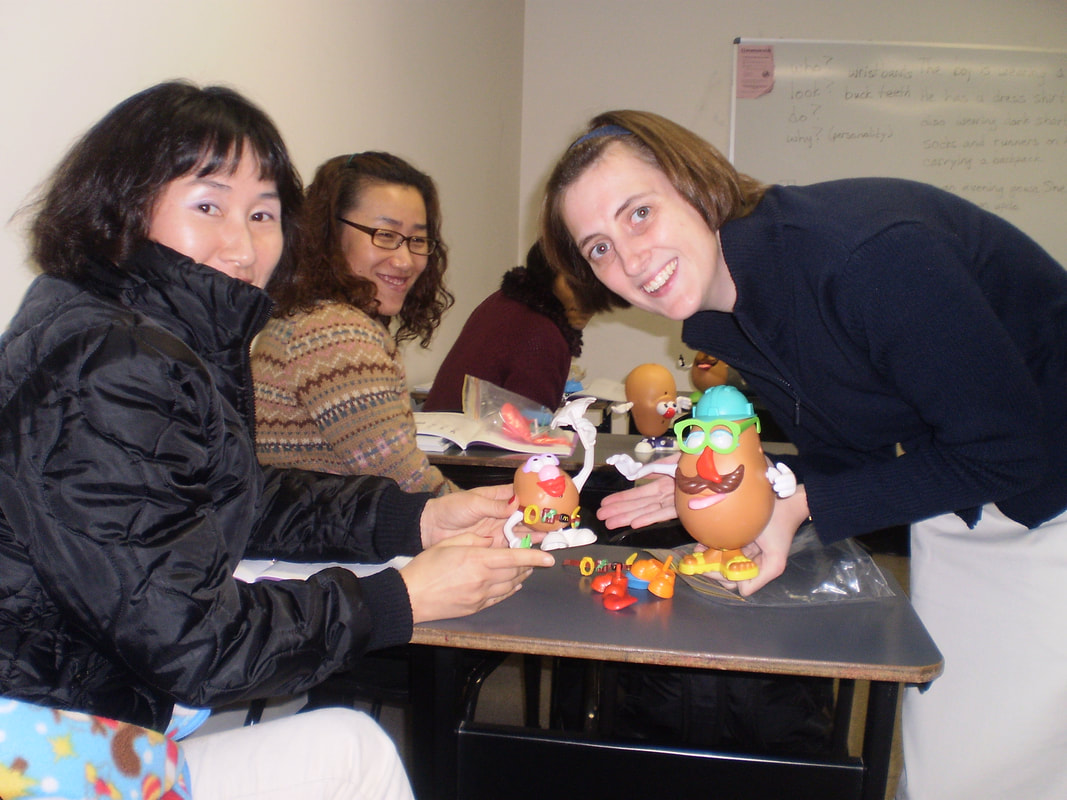
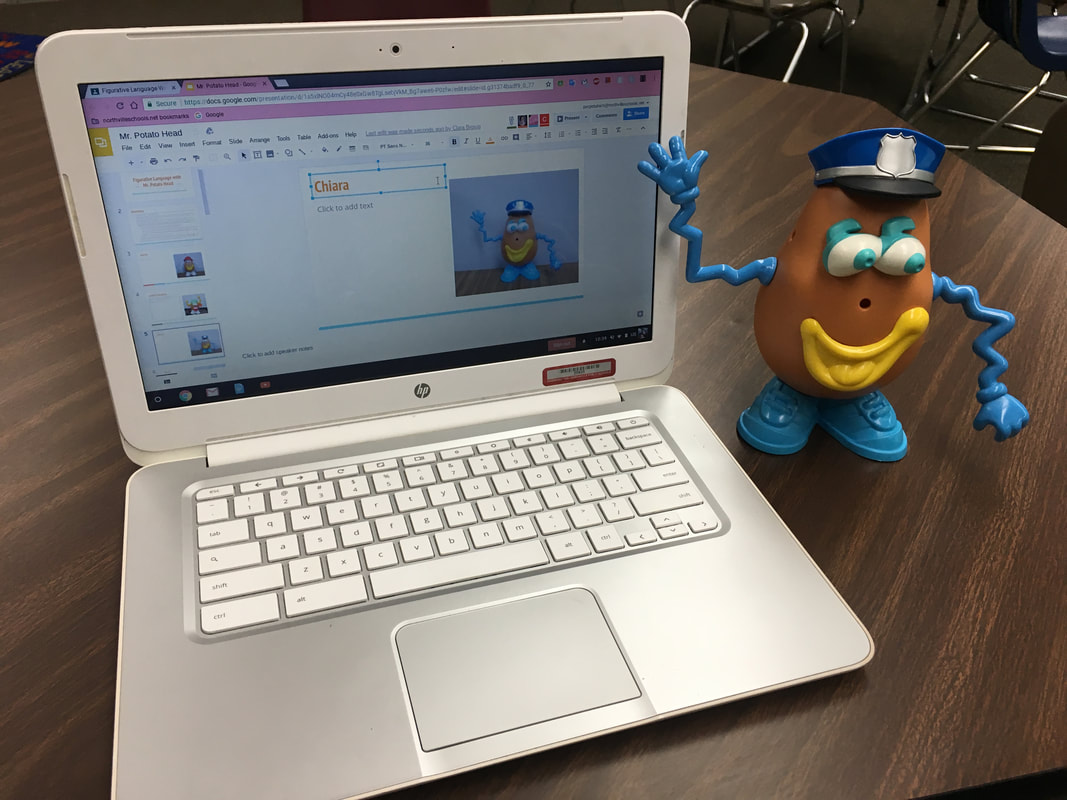
A few years ago, when standardized tests were moved fully online, my students' writing scores took a nose dive. I realized the problem was their typing skills, not their writing abilities. They had spent so little time actually producing writing on a computer that they were unable to do so in the time-pressured environment of a standardized test. I resolved to change that and added a technological component to our Mr. Potato Head project. Now, instead of writing on paper, students build their potato, use a camera (either the one built into the Chromebook or their phone) to take a picture of it, and then insert the picture to a Google Slide and type their descriptive paragraph next to it. I then take all of the slides and create a Mr. Potato Head matching activity by placing all of the pictures, in random order, on the first slide, and the descriptive paragraphs on the following slides. I make a copy for each student, and they cut and paste the photos onto the slides with the corresponding descriptions. To add an extra layer of fun I also send the matching activity to our principal and vice principal. If both administrators are able to correctly pair a student's photo to its description, the student receives extra credit points on the assignment. The students loved it, and our administrators were quite happy to participate as well.
While toys such as Mr. Potato Head may seem juvenile and beneath older students, they really aren't. I've done this lesson with all ages, from upper elementary to adults, and they all love it. It really is one of the few writing lessons that students will actually ask if they can do again and again. Yes, obtaining all of the Mr. Potato Head sets was a bit of a pain (check Ebay for used sets or try to get a Donor's Choose project funded). Yes, storing them does take up more room than most of my other materials. But it's totally worth it and I love teaching this lesson every time I get the chance. Check out the buttons below to get the five senses descriptions poster I use in my classroom and more descriptive writing activity ideas for free!
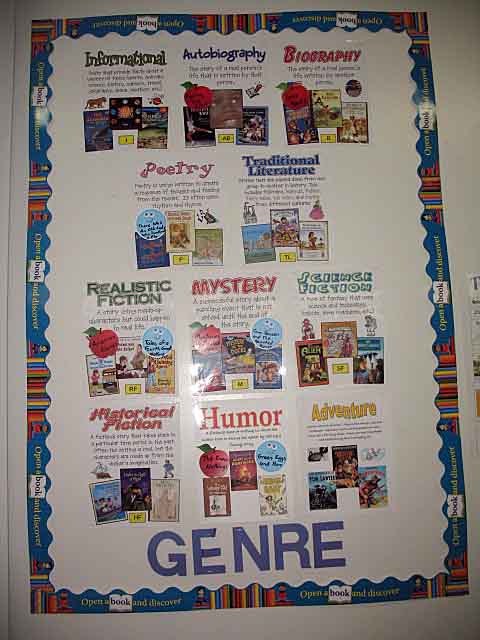
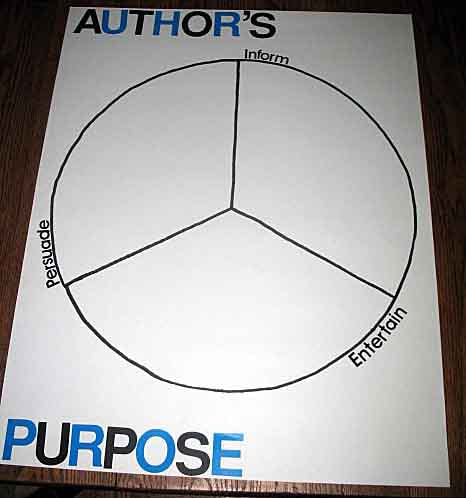
prediction as to the genre and the author's purpose for the text. We'd write the title of the selection on two small shapes (pre-cut calendar shapes work great), attach one to the appropriate genre poster, and the other to the correct section of our author's purpose pie. We'd then proceed with our lesson and, after we'd thoroughly studied the text, return to our predictions and adjust it if needed.
The students quickly became comfortable with the names of various genres and sometimes engaged in quite heated debates over distinctions such as if a text was historical or realistic fiction. The words persuade, entertain, and inform also became commonplace and the discussions over where to place a particular text could sometimes only be ended by placing it on the line between two sections. The real test came that first spring when standardized testing rolled around. I knew my students could determine genre and author's purpose as a group, but would they be able to apply their knowledge as individuals, and in a testing situation? I needn't have worried, they all did great, and their scores rose tremendously on all areas of the test. I wish I could tell you where I found the genre posters. I know that I downloaded them for free from some location on the internet, but have forgotten where over the years. The only one that I know for sure is the humor poster, which I designed myself to add to my set. All of the posters can be downloaded via the buttons below (each has a zipped folder with letter-size PDF files). I highly recommend using a cold laminator to protect your posters. The cold lamination lasts much longer than the hot and is not nearly as prone to peeling. The author's purpose poster is something I made by hand. I used a piece of poster board and then traced around a laundry basket to make the circle. Then, using what little bit of geometry knowledge I have, I measured the diameter, found the center point, and divided the circle into three sections. The letters were stickers I bought at Walmart, or some other similar store. I hung everything on my classroom wall and the fun began. It really is amazing how small differences can make such a big outcome in student learning. The new vocabulary, genre, and author's purpose posters and supplies cost less than $25 for the year (and most were reusable), and the discussions only added about ten minutes total to my teaching time. Such a small investment for such huge gains!
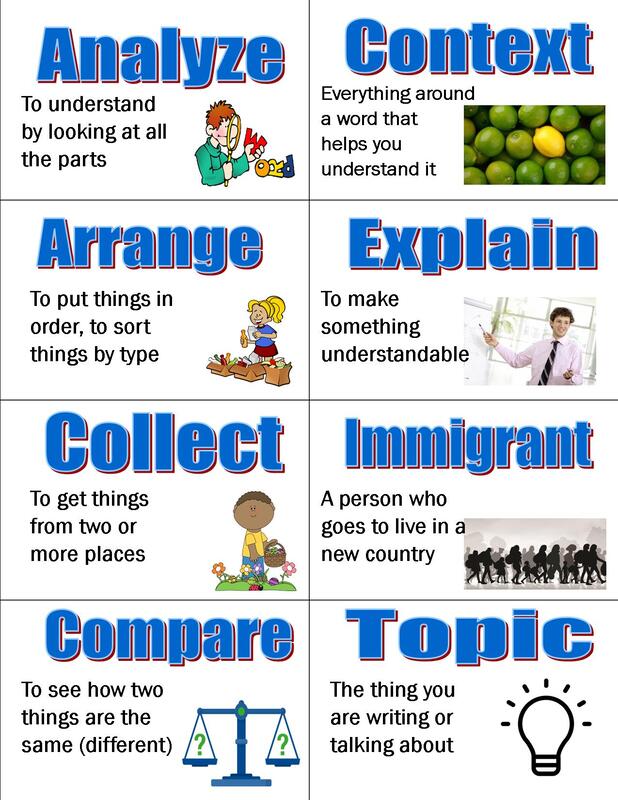
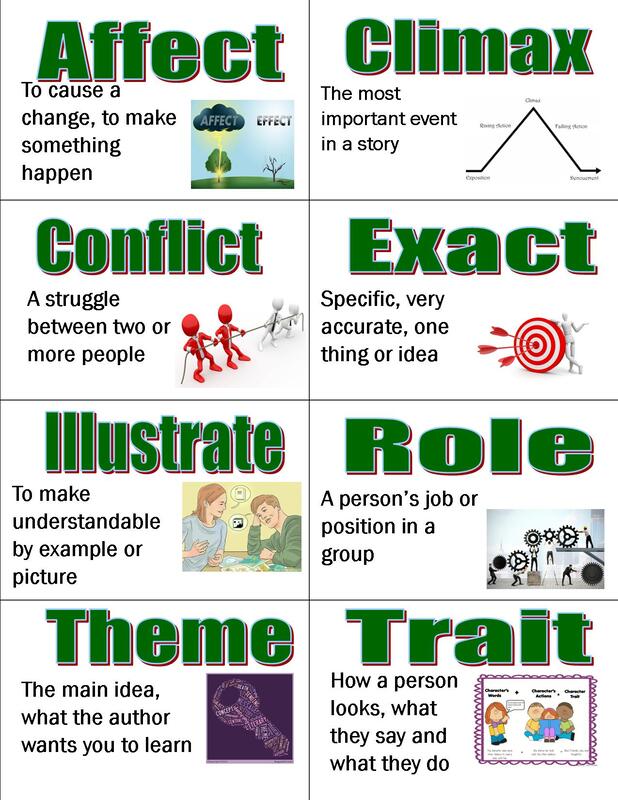
My next step was to go through my curriculum and make a word wall card for every vocabulary word in every story. Each card had the word, a student-friendly definition, and a picture. You can download the pdf version of these cards for yourself using the buttons below. I will warn you though, I never actually taught all eight units of either book, so I never actually finished the final unit of level A, nor the last two of level B. I also realized too late that I would eventually need to sort these cards out again and it might be good to label the back of them with the level and unit number. Hopefully you can learn from my mistake and save yourself some time and work.
Then came the fun part: the teaching. Before we'd read a selection in our books, my students and I would all gather around the word wall. We'd discuss the vocabulary for that selection one-by-one, talking about the word and its definition, discussing the part of speech, finding it in the text and reading the sentence, and then creating example sentences of our own. We'd then staple the word into the correct section of our word wall and move to the next. By the end of the year we had quite the collection of words, but now they were all words we had carefully considered and used, we'd actually learned the vocabulary. Besides the vocabulary from our readings, we also worked with academic vocabulary from two different sources. The first was the previously mentioned CCSS academic vocabulary units I did with all of my classes, and the ELA teachers at the schools used as well. The second was the academic vocabulary addressed by the Inside series. The text books themselves had virtually nothing addressing academic vocabulary, and what was in the workbook was weak and (in my opinion) boring. I ultimately made a list of the words practiced in each unit and created my own academic vocabulary instructional plan and activities. Besides the word wall cards, for each unit we also had a cart we completed (word, picture, definition, example sentence), sort cards, clip cards (center held the definition, the words were around the edges), match-it cards, worksheets, scrambled word sets, and an assessment. The entire package is available for both Inside level A and level B (click the pictures above), but can also be used with any curriculum as they don't depend on the Inside texts at all. It took time for the students to adjust, but the word wall became a valuable resource with students often perusing it to remember old words and discover new. Since we spent significant time discussing the words before adding them to the wall, the students felt a sense of ownership over it. When I tried to take some of the older words (from first semester) down to make room for new ones, they protested quite vehemently saying, "Don't mess up our wall!" I was ultimately forced to expand the word wall to a second (and sometimes third) bulletin board, but I didn't mind, my students were learning and using new vocabulary!
coloring picture, vocabulary, a short reading (less than ten sentences with an illustration for each sentence), and comprehension activities. They are the perfect level for beginning students, and every holiday you can imagine is represented, with the "bigger" holidays having more than one reading and comprehension. It was my low intermediate students that I was struggling with what to do. They already knew the basics of the holiday, most had been in the USA for at least one year, but I still didn't want to get into the scarier aspects, or the history of it. I finally decided that I wanted to approach it using literature.
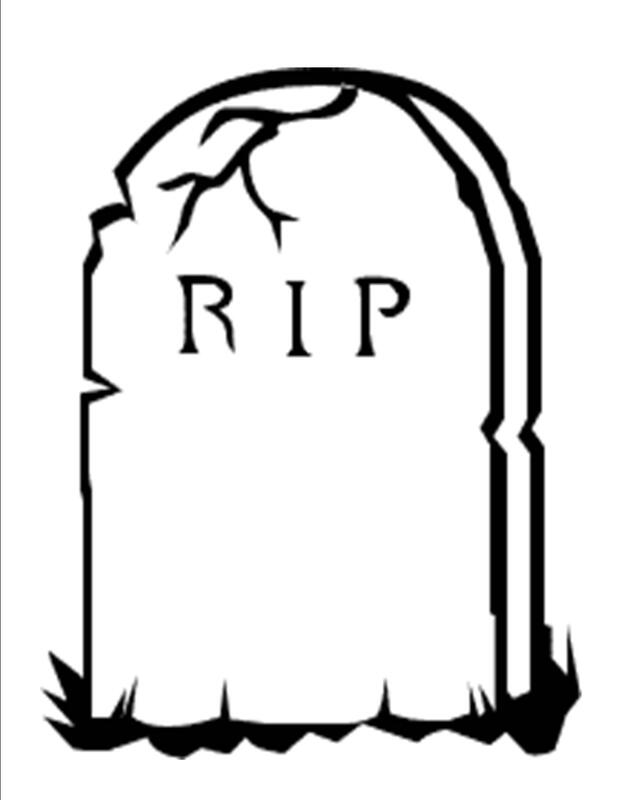
One of my favorite series to use with intermediate language learners is the Cam Jansen series by David A. Adler. The books are mysteries, but they are not scary, and have a touch of humor to them. The main characters are relatable and the books provide excellent opportunities to practice skills such as predicting, inferencing, and others. They are also relatively cheap (usually less than $5 a copy), so I could afford to get a copy for each student (I did a Donor's Choose project to get the funds). Thus, Cam Jansen and the Mystery at the Haunted House became my book of choice for Halloween. I sourced much of our comprehension work from edHelper, and their free literature unit for the book. To go along with it, my students and I created The Word Cemetery bulletin board, which I described in my last blog post. The first time I taught the book I realized I'd forgotten something: vocabulary. How I forgot vocabulary is still a mystery to me. I spend huge parts of my life teaching vocabulary and have an entire set of vocabulary activities I use regularly. Since I never want to make the same mistake twice, I developed a vocabulary sort activity to use in the future. Now, before reading the book, we go over the vocabulary and use the sort cards (available by clicking on the pictures above) to practice. The last couple of years I've been teaching adults at a community college and I've actually missed getting to read this book. If our curriculum weren't so packed, I'd still try to work it in, but for now I just remember previous years fondly. Hopefully you and your students can enjoy the book for me. Happy teaching!
Each student received a different graphic organizer (a total of eight words were represented). After completing the graphic organizer they were able to use it as payment for a tombstone and ghosts. In groups (based on the word from their organizer) the students designed the tombstone listing the overused word as the name and the part of speech as the relationship. They then listed one synonym on each ghost (a minimum of three was required) and decorated those as well. Everything was eventually combined into one bulletin board under the title of "Word Cemetery Where Dead Words Rise As Synonyms." The students loved it and actually started using some of the synonyms on occasion! Administration thought it was great too and specifically commented on how clever it was after a walk through. This year our October celebrations are online so I wanted to develop a digital version of the activity. I decided to use one of my favorite programs: Google Slides. The basic concept is still the same and slide four (pictured above) has the eight tombstones, along with an example and a supply of ghosts already provided. The example and tombstones themselves are in the background, and thus protected for accidental (or not-so-accidental) editing. The graphic organizers appear on the following slides, one for each word, and are also in the background, with textboxes supplied for student notes. One of the things that most excited me about this project was it gave me a chance to create my first "infinity" draw piles. I'd seen other digital activity descriptions refer to them, but hadn't really thought about their creation. It turned out to be remarkably simple, one of those "Duh!" moments that I seem to be having so often these days. I simply chose my ghost (once again I was able to find the royalty free clipart I needed on Pixaby), added a text box, grouped the two together, and copied/pasted it about 20 times. I then selected all of the ghosts (easier for the first set since I could simply click ctrl+A), right clicked on them, chose align vertically-middle, align horizontally-center, and they had all moved into a single pile. I repeated the process with the second ghost (because I just had to have two different ghosts), and I had two "infinity" piles of ghosts students could drag and drop. Of course the piles aren't truly never ending, but since students were only required to do three synonyms per dead word (meaning a total of 24 synonyms), and there are about 40 ghosts in total, the chances of them running out are slim. If your students are over achievers, and you fear them running out, simply paste a few more ghosts onto the slide before aligning them into a single pile. You can get both of these activities for yourself by clicking on the pictures above. As I said, my students found the process to be a lot of fun and it was a great addition to our October festivities. Happy teaching everyone! Want more synonym fun? Check out my French Fry Synonyms Sorts!
 On Monday I shared with you one of the fun games that my students and I play to practice prepositions, Mousy Prepositions (paper, digital). Of course prepositions is not an easy topic and we practice it quite a bit, so we need more than one game. Today I'd like to share with you three other activities that my students particularly enjoy when learning prepositions: Going Buggy for Prepositions, Preposition Pictionary, and Lego Preposition Build.
Going Buggy for Prepositions Going Buggy for Prepositions is an activity is based off of The Insect Game, which I read about in a book that I've long forgotten the title of. To play you will need plastic toy insects, a set of noun cards, and a set of preposition cards. The free download linked above, and via the button below, will give you noun and preposition cards you can print. I recommend printing the noun and preposition cards on a different colors of paper to make separating them easier. Place students in groups of 2-4 and give each a set of supplies (at least one insect and set of cards per group, but my students always want their own insects). On their turn, each student draws a noun card and a preposition card. The student must then make his/her insect demonstrate the chosen preposition with the selected noun. If he/she is able to do so, he/she gets a point. This game is not quite as exciting as those that follow, but it does get the students up and moving, which is generally a good thing. Preposition Pictionary I wish I had some great inspiration story to share with this game but, as is often the case, it was born out of desperation. There was some kind of problem in the building, nothing serious, but all students were told to remain in their current classrooms until further notice. Since we'd already been together for over an hour that day, the students quickly began to get restless. I wanted our time together to be productive in some way, but I didn't want it to be boring. We'd been practicing prepositions, but had already played Going Buggy for Prepositions, and I was struggling to keep students engaged. One of the students started doodling on the board and another started trying to guess what she was drawing. Then it hit me, Prepositions Pictionary! I grabbed the prepositions cards from Going Buggy for Prepositions, quickly divided the students into two teams, and explained the basic rules of Pictionary to them. On a team's turn, one person would come up, draw a preposition card and, without showing it to anyone but me, illustrate the preposition on the board. Their teammates would then have to try and guess the preposition being drawn. If they were successful before time ran out (I gave them 60 seconds), they got a point. If not, the other team got one chance to guess. They LOVED it! When the announcement came dismissing them to the next class they actually groaned aloud. From then on Preposition Pictionary was the game they begged to play when we had extra time. One enterprising group even revised the rules because there was a field trip and only three people were in attendance. They decided to play as individuals. If you guessed the preposition you got two points and the right to be the next illustrator. The illustrator whose illustration lead to the correct guess received one point. Lego Preposition Build Who doesn't love Legos? I always kept some in my classroom and even my middle schoolers liked just sitting at a table (or on the floor) and building things while chatting quietly with a friend. Some might say they were wasting time, but I think it was a great brain break, and since they were usually talking in English, in an ESL classroom, it was good speaking practice. We also used the Legos in our math lessons (especially when learning fractions), but I always wanted to use them in a grammar lesson. Then one day I received an email with picture instructions for building some object out of Legos and it hit me: prepositions! That summer I looked for the best deal I could find on Legos and bought some extra (This Classic Set was the best deal I found, especially since I had the time to wait for a sale.). I also saved and printed all of the building directions I could find, which ended up being 50 in total. I have uploaded the pdfs to a Google Drive folder and the button below this post will allow you to view the folder. You will want to either download the files you want, or save a copy to your own drive, to ensure continued access. By the time school rolled around that fall, I was ready to go. The students partnered off and arranged themselves at tables around the room. I gave a bin of Legos to each set of four students and one of each pair received a set of picture instructions, which they were not to show their partner. The student with the instructions then told their partner which Legos to choose and how to arrange them to form the object in the picture. Since the picture instructions already had the process broken down into steps the student could concentrate on giving clear instructions without worrying about how the object was built. After the building phase was complete students compared the picture to the final product to see how they did. The next day (or the same day when I had a block schedule) the partners switched roles and completed the activity again, but with a new picture. The students loved it and practiced a lot more than just prepositions. The next year when some of my repeat students heard we were going to work on prepositions again they specifically asked to do this activity. Well, to quote the Looney Toons, "That's all folks!" Those are my four best non-worksheet preposition practice activities. Unfortunately I've only managed to translate Mousy Prepositions to the digital world, but I'm still thinking about the others. If I get hit with inspiration, or discover a great resource, I'll let you know. In the meantime, happy teaching!
mean about a time best forgotten?). My mother very calmly looked at me and said, "Prepositions are easy. Just think of everything a mouse can do to a box." That, among a few other famous mnemonic devices (I'll forever remember the capitol of Nebraska because, according to my mother, "Lincoln had big knees, but he never went to Nebraska."), became my academic salvation. I did pass my test, and to this day, prepositions, mice, and boxes are forever linked in my brain.
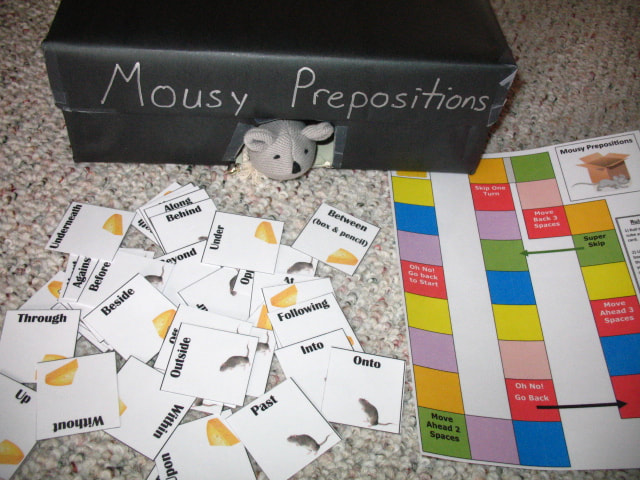
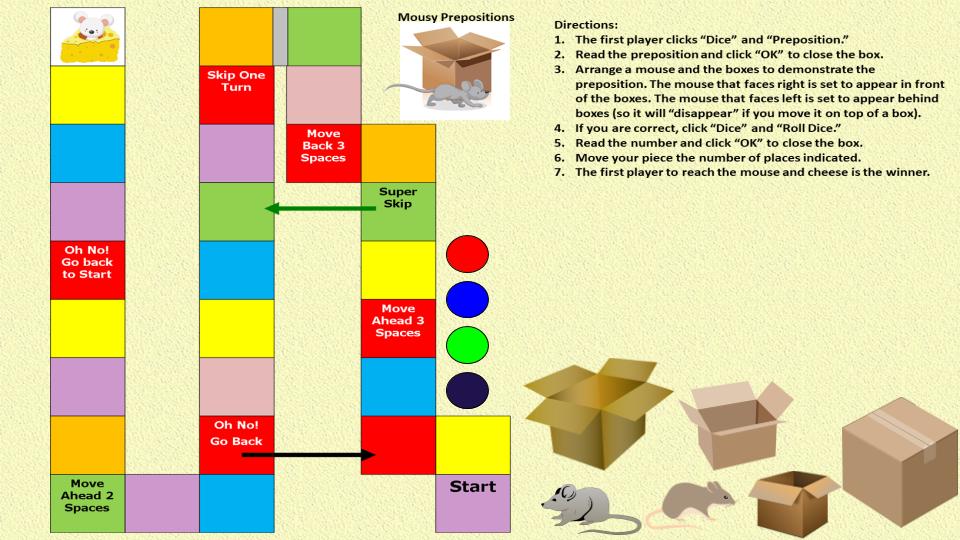
When I became and ESL teacher and had to teach prepositions, my students were whining and struggling, my mother's mnemonic device was echoing in my ears, and I did what I always do when faced with a boring grammar concept that must be mastered: I created a game. Prepositions are visual and I wasn't satisfied with simply making a board game with cards and tokens, I needed a mouse and a box! The mouse was relatively easy to obtain, they are plentiful and cheap in the pet section of any store. The box posed a bit more of a challenge as I needed something the mouse could be in, on, go through, etc. After thinking about it for awhile, I took an old shoe box and wrapped it in black bulletin board paper, being sure to wrap the lid separately. Then I cut a hole through each side of it, making a tunnel for my mouse to pass through. A quick game board and some cute preposition cards decorated with mouse clipart, and Mousy Prepositions was born. Students could draw a card, read the preposition, use the mouse and box to demonstrate the preposition, and (if correct) roll a number cube to advance on the board. My students loved it and my only challenge was keeping my pet cats away from the toy mice. :D Now that digital learning has become a necessity, I didn't want to give up my fun game, so created a Digital Mousy Prepositions game as well. I simply turned the game board into an image file and inserted it onto a PowerPoint slide that I'd resized to 17x11 (see my earlier blog posts Alphabet Adjective Zig Zag and Too or Enough for more information on how I create my game boards). The clip art for the mice and boxes was easily obtained from Pixaby. The part that I had to think about was the prepositions. I really didn't want my students having to click from slide to slide to "draw" a card, as they do in other games that utilize the game play script my husband wrote me. I wanted them to play the entire game on the slide that held the game board. The answer ended up being a custom prepositions script, again written by my husband, combined with the dice script he'd previously written. The resulting game was something students could play on a single slide, with minimal clicks. Take a look and see for yourself: I owe a big thank you to both my seventh grade ELA teacher and my mother for inspiring these fun (and free) games. My students definitely think this is a much more enjoyable way to learn prepositions than endless pictures and worksheets with questions such as: "The ball is ____ the desk." Stay tuned later this week for two other rodent-free fun (and free) ways my students and I practice prepositions. Get both versions of the game, and the other resources mentioned in this post, by clicking the pictures and links above or the buttons below!  There is an erroneous idea floating around educational circles. Not everyone believes this, but many do, and some unconsciously allow this idea to affect their lesson planning and teaching. It is the idea that English language learners (ELLs) can't meet the Common Core (or any) State Standards. As we discussed in my last post, the vast majority of ELLs have grade level knowledge and abilities, the only thing they lack is the ability to express their knowledge in English. They CAN meet Common Core Standards, they simply need to do it in a different way.
In order to assist our colleagues in their instruction of ELLs (because as was also addressed in my last post, the vast majority of the work falls on the general classroom teacher, the ESL teacher is there to assist), a fellow ESL teacher and I developed a reference tool. We took the Common Core State Standards for K-8 (we were at a K-8 school) ELA and the WIDA Can Do Descriptors and combined them into a chart. For those who are not familiar, the WIDA Can Do Descriptors "highlight what language learners can do at various stages of language development" (taken from the WIDA website). In other words, they describe what ELLs are able to do at various proficiency levels to communicate their knowledge in English. Within the document you will find a page (there are 358 pages, so I wouldn't recommend trying to download it to a phone) for each of the CCSS ELA standards. On each page you will find the standard, the cognitive function (I can) statements for that standard, a chart showing the reading/listening and writing/speaking can do descriptors for each of the five WIDA levels (level 6 is considered grade level proficient), and academic vocabulary words relating to the standard. If a teacher has an ELL, he/she is able to look up the standard that will be taught in a given lesson, find the student's proficiency level in the chart, and read the can do descriptors for how that student can demonstrate competency with that standard. This not-so-little document has unequivocally become the most helpful, most requested, most beloved teaching resource I've ever created. The good news, if you haven't already discovered it, is the document is available for download with this post. You can click the blue words chart and document above, or the button below, to download it for yourself. Remember, it is over 300 pages long and 2.81 MB in size, so you might not want to try this on a phone. Feel free to download, print, use, and share with your colleagues. All we ask is that you please give proper attribution. While the standards and the can do descriptors aren't ours, the alignment and formatting are, and it was a lot of work to put together. The bad news is no, there is no document for grades 9-12. I always meant to create it (my colleague was our little people expert, so this is my fault, not hers), but never got around to it. The highest grade I taught after WIDA came to our state was 9th, and I just referenced the 8th grade standards for them. Then a couple years ago I migrated to the college level and haven't done much with Common Core or WIDA since. Since I don't want to leave you on a negative point, I'd like to share with you about another resource that my middle school colleagues may find useful. I spent most of my K-12 career in middle school (and loved it, I still miss it), and one of the greatest needs my students had was academic vocabulary. I was the ESL teacher who believed my students could understand and use the "difficult" vocabulary if someone just took the time to teach it to them. Hence my new arrivals knew words such as "consequences," "appropriate," and "stupendous" before they knew much more basic vocabulary. Since I couldn't find a way to fit all of the academic vocabulary into general everyday interactions (I may have been known to use behavioral correction discussions as opportunities to teach parts of speech: "What verb did I ask you to use? What verb were you demonstrating? What adverb did I use to describe the verb? What adverb did you demonstrate?"), I developed a program to explicitly teach the CCSS academic vocabulary words for grades 5-8. The program only took about fifteen minutes a day to implement, but by the end of the year my students had learned 150+ academic vocabulary words, and were much less intimidated by standardized tests. I also developed a context clues game to practice these words. There are buttons below to link you to these resources if you think they'd be helpful for your students. Happy teaching everyone, and remember: ELLs Can Common Core! |
I'm moving! Find me at my new home via the button below. If you've previously signed up to receive new post emails, please reenter your email on the new blog.
Categories
All
Archives
January 2021
|