long-term English language learner's academic reading and writing skills. The grant had been approved, and now it was time to put the program into place. The problem was, no program actually existed. I was handed a blank sheet of paper and told to develop a program that would improve student scores in reading and writing, specifically on the WIDA, NWEA, and P-SAT tests. The target student was a long-term, high intermediate to advanced EL. You know the students, we all have them, those who have an excellent grasp of English, but always miss exiting the program just just a few points, usually in one or two skill areas. The types of data needing to be tracked was listed out, counselor cooperation to redo student schedules was promised, and I was told to keep everyone in the loop.
With no idea of where to start, I headed to school and started digging through our supply closet, looking for inspiration. In the back, unopened, and just waiting to be discovered, I found Fountas and Pinnell's LLI Teal System, and inspiration struck. I moved the boxes to my classroom, pulled out all of the nonfiction texts, and started trying to find the titles I thought would most interest students. I continued pulling in resources from places such as Reading A-Z, NewsELA, my own library at home, and our primary curriculum series, National Geographic Inside. I spent the year planning out units, staying one step ahead of students, and trying to explain the hoped for benefits of the class to administrators, parents, and students. By the end of the year, the students and I had had a lot of fun. Since there was no set curriculum, we were able to explore topics and themes that we were interested in. Each unit was themed around a book from the LLI series, supplemented with other resources, and culminated in a written paper of some kind. We learned about bionics, artificial intelligence, chocolate, and even famous April Fool's Day pranks. The final data was better than we had hoped for, with students achieving their highest scores ever on the WIDA reading and writing sections. My sixth and seventh graders improved an average of 209% on their NWEA reading test, and the eighth graders all passed their P-SAT (average score of 410). Many of the students were finally able to exit the ESL program, which made everyone very happy. Unfortunately, I only had the opportunity to teach the class for one year. My position with the district was originally part time, but in January of that school year became full time. Full time work was not something I wanted to continue with, so at the end of the year I left the district. My successor did continue to use the materials, but I wanted to share them with a wider audience. The button above will link you to my Teachers Pay Teachers store, where you can download a zip file for free. In the file you will find a materials list with links for the various commercial resources (such as the LLI system) and a folder for each unit. Each unit's folder contains a lesson plan and the materials I am able to disseminate for free. In the lesson plan I provide Word documents and links to other materials I used (most are free) and Google doc templates of the Word files. I've tried to be as clear as I can in the plans, but please feel free to contact me if you have any questions. Happy teaching, everyone.
6 Comments
menu (available for free from the original blog post linked above) was based off of seventh grade Common Core Standards and the Core Competencies for the ESL department at the college where I teach. The level one English Skillology menu (also available for free by clicking the picture or this link) is also based off the Core Competencies of our department, but the Common Core Standards come from the third grade ELA set.
Much of the design was the same, and you can read about that in the first blog post. The method worked well for both the students and myself, so I saw no reason to change it. Reusing the basic design allowed me more time to focus on the activities themselves, and I think there's a good mix of skills represented. Here's a quick overview of the 20 activities: Reading
The set up of this activity is slightly more involved than Mr. Potato Head, but not much, and the storage is a lot easier! You will need 4-6 pictures (depending on how many students you want in a group) of different subjects. I have a set of about 12 that I've found over the years, printed on full-size sheets of paper, and laminated. I found most of them by looking at the results of various Google image searches and saving what caught my eye. Since I wasn't selling or distributing them in any way I wasn't too concerned about copyright (I told students the images weren't mine), but if you're looking to find royalty free images that are marked for reuse, Pixaby is always my go-to option. I've also used postcards at times, but find they are a little smaller than students like, and more difficult to see. You will also need several large sheets of paper, one for each image in each group. In the past I've varied between using pieces of bulletin board paper taped to the wall, and sheets of ledger size paper placed on tables. I think easel pads would also work well, but never had one to try it out. The final thing you'll need is a different color marker for each student in the group. Once you have your supplies, create your stations by placing a large piece of paper and an image at various locations around the room. You want to give students enough room to work, but not spread out too much because you'll have more than one group working at a time.
Students complete the activity by choosing a marker and a photo to start with. A timer is set (I always used one on my smart board or my phone) and students are given 60 seconds to write down as many descriptive words and phrases as possible for their photos. Once time is called, students all move one photo over (taking their markers with them), and start again. For the second, and all following rounds, I give students 90 seconds because they first have to read what those before them wrote. They are told to not repeat what other students have said. I encourage students to try to write at least 3-5 things for each photo. We continue rotating and writing until students have viewed and wrote notes about each photo. Students then return to their original photo and read over the descriptive words and phrases their classmates wrote. If there are any questions, or words they don't know/can't read, they are given time to consult with their group members. They then use the words and phrases from the brainstorming paper to help them compose a descriptive paragraph for the photo. I tell students that they don't have to use all of the suggestions, but to try and use as many as possible. I also encourage them to make inferences about the events of, before, and after the picture in order to create a descriptive narrative, rather than just a paragraph about what they can see. Since remote learning and social distancing have become the norm for this year, I needed to tweak this activity. I chose to make it digital by creating a Google Slides deck for each group. I chose Slides because it is familiar to my students, but I can easily see this working with Jamboard, Padlet, and a host of other apps as well. The first slide of the deck has directions for the students (basically the same as described above, but I give 90 seconds for all rounds to keep things even and give students time to remember how to work the digital components). Slides 2-6 are the brainstorming slides. On each slide is a photo (most from Pixaby), "infinite" piles of digital sticky notes in five different colors, a 90 second timer (YouTube video), and a button that links to the paragraph slide for later. To make the "infinite" piles I used the shape tool to draw my sticky note, changed its color, formatted the text, copied and pasted it about 30 times, selected all of the shapes, aligned them to the middle, and then aligned them to the center. I then dragged the entire pile to the location I wanted it, copied and pasted the entire pile, changed the color of the new pile, and dragged it to where I wanted the second pile to be. I continued pasting, changing the color, and dragging the piles until I had five. Slides 7-11 have the pictures repeated, a text box for the paragraphs, and a button that links back to the corresponding brainstorming page. The hyperlinked "Paragraph" and "Notes" buttons allow students to quickly jump between the brainstorming and corresponding paragraph slides as they write. Once I had my slides set up, all that was left to do was share it with the students. I made a copy for each group, and shared the appropriate copy with all group members receiving editing rights. Students were then able to complete the activity in real time from wherever they were. I can also assign them the activity in stages, giving brainstorming an earlier due date than the paragraph, for asynchronous learning. Describe That Picture! really is a fun activity, and I always enjoy seeing what the students come up with! You can get the Google Slides deck for free by using one of the links in this blog, or the button below. You can also get the free five senses poster I hang in my classroom, and more descriptive writing activity ideas via the same methods. Happy teaching, everyone!
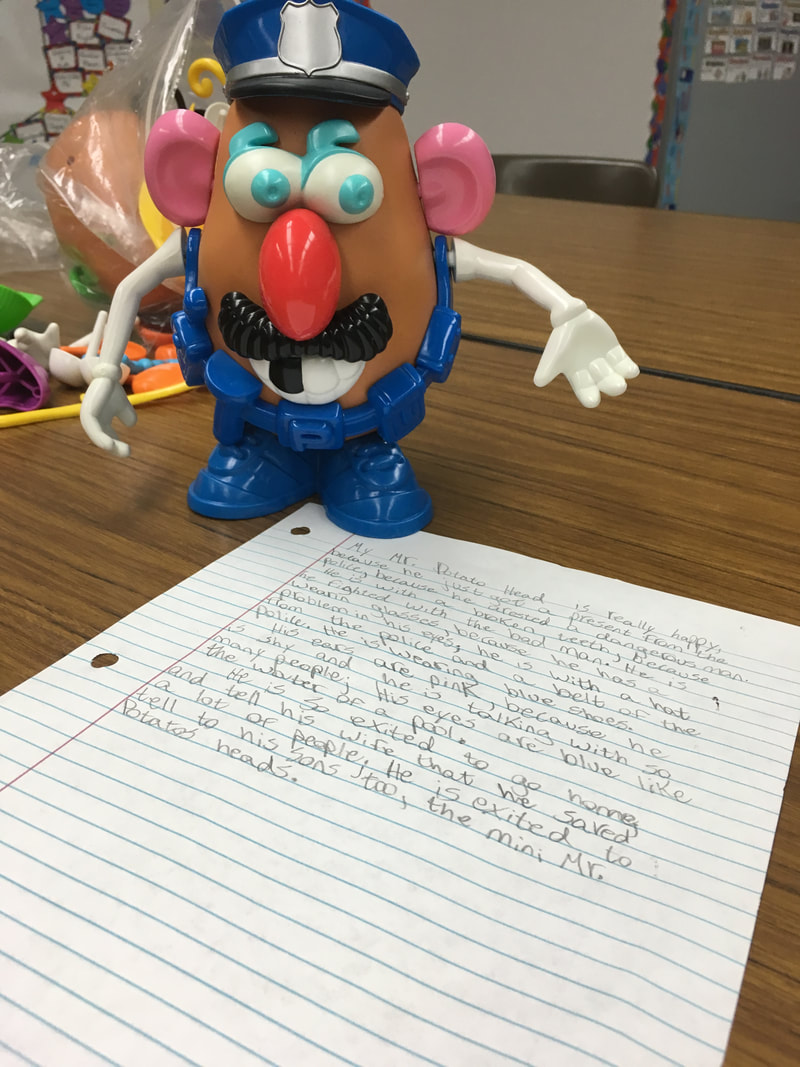
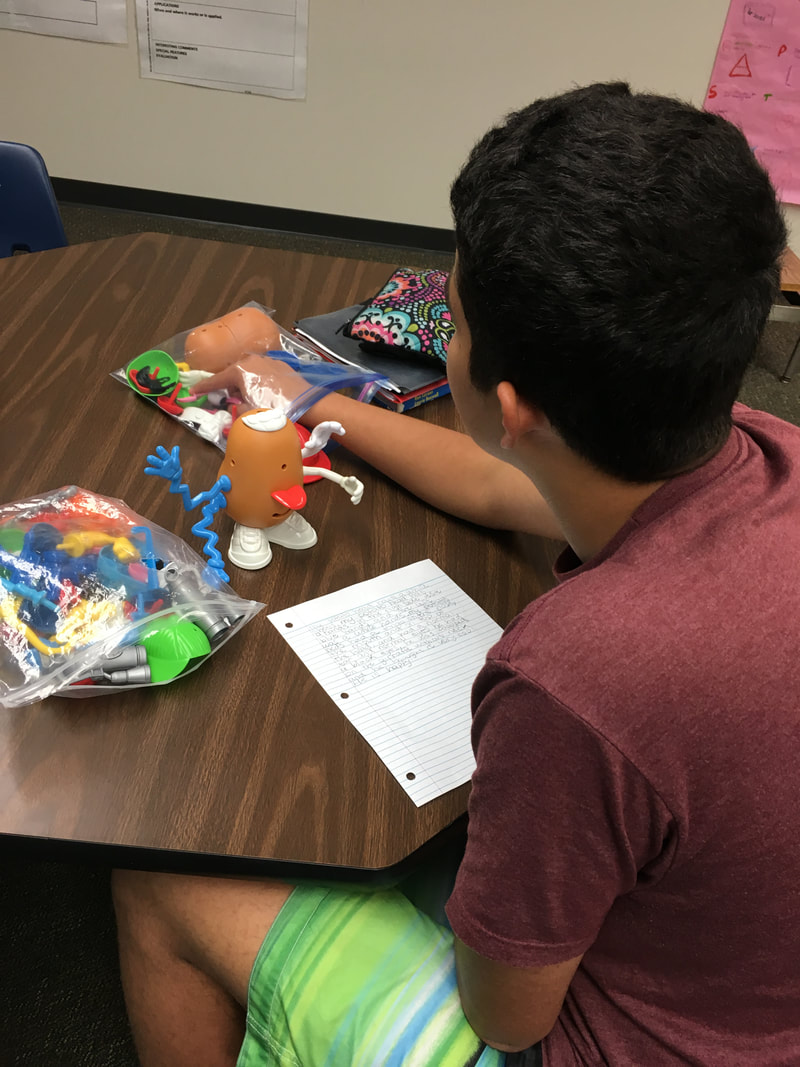
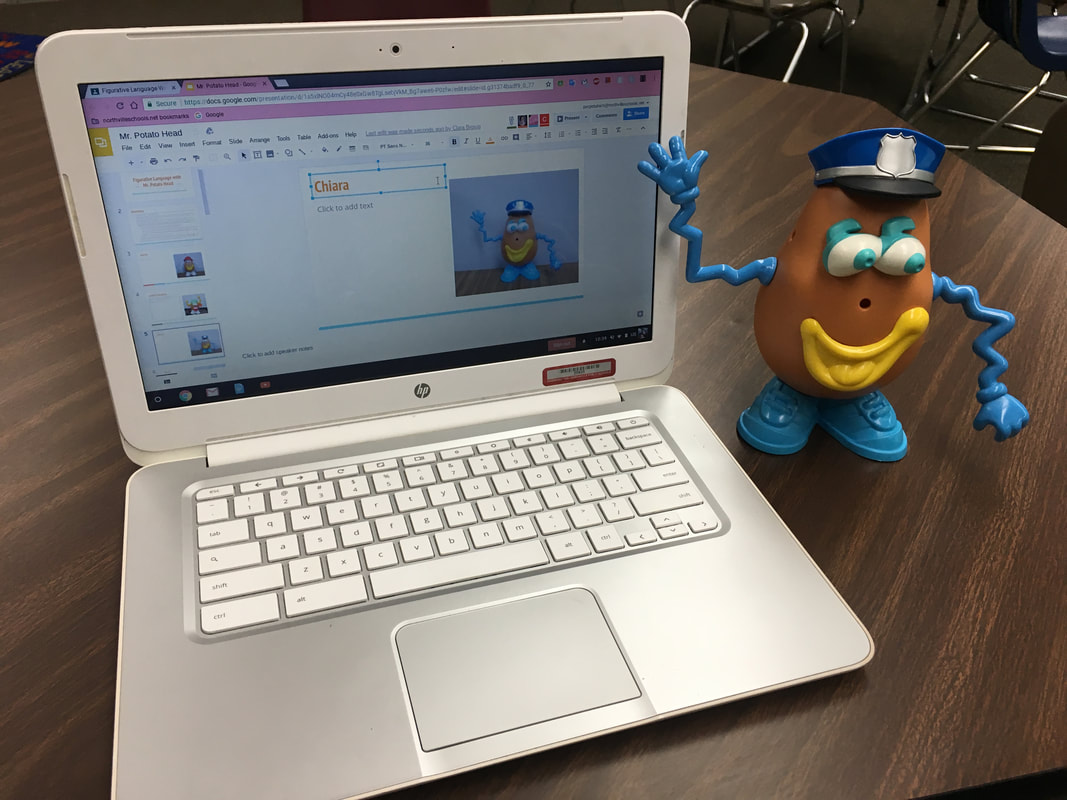
A few years ago, when standardized tests were moved fully online, my students' writing scores took a nose dive. I realized the problem was their typing skills, not their writing abilities. They had spent so little time actually producing writing on a computer that they were unable to do so in the time-pressured environment of a standardized test. I resolved to change that and added a technological component to our Mr. Potato Head project. Now, instead of writing on paper, students build their potato, use a camera (either the one built into the Chromebook or their phone) to take a picture of it, and then insert the picture to a Google Slide and type their descriptive paragraph next to it. I then take all of the slides and create a Mr. Potato Head matching activity by placing all of the pictures, in random order, on the first slide, and the descriptive paragraphs on the following slides. I make a copy for each student, and they cut and paste the photos onto the slides with the corresponding descriptions. To add an extra layer of fun I also send the matching activity to our principal and vice principal. If both administrators are able to correctly pair a student's photo to its description, the student receives extra credit points on the assignment. The students loved it, and our administrators were quite happy to participate as well.
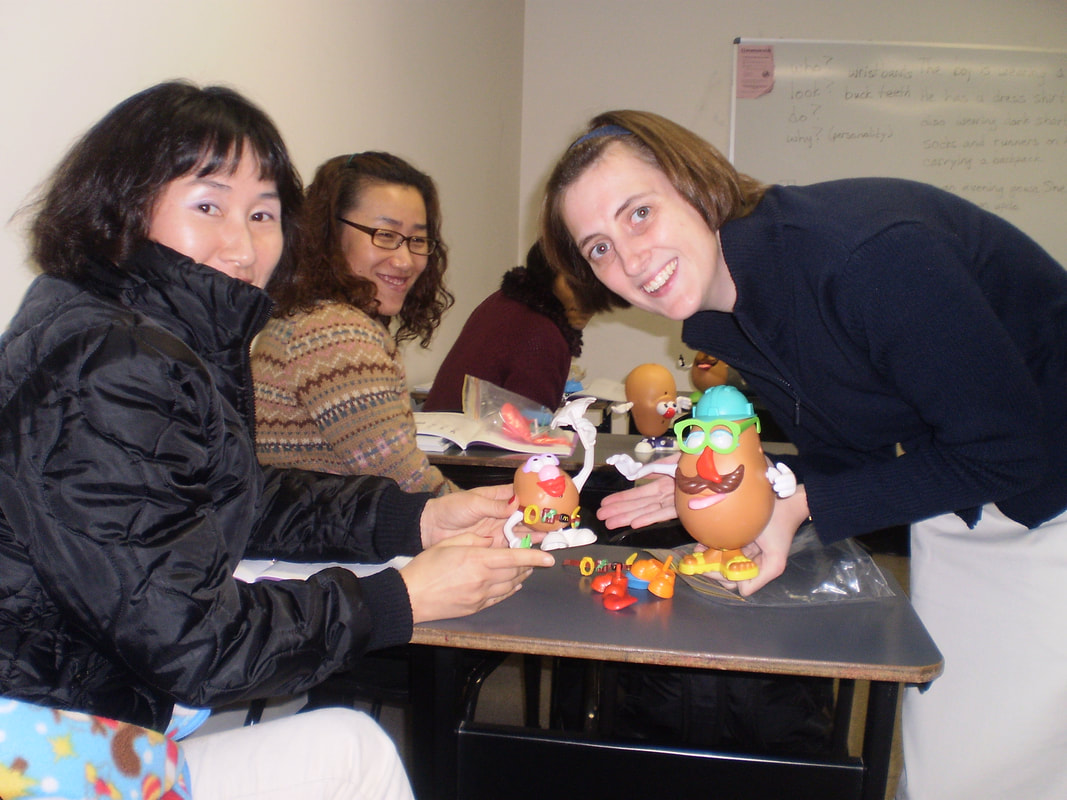
While toys such as Mr. Potato Head may seem juvenile and beneath older students, they really aren't. I've done this lesson with all ages, from upper elementary to adults, and they all love it. It really is one of the few writing lessons that students will actually ask if they can do again and again. Yes, obtaining all of the Mr. Potato Head sets was a bit of a pain (check Ebay for used sets or try to get a Donor's Choose project funded). Yes, storing them does take up more room than most of my other materials. But it's totally worth it and I love teaching this lesson every time I get the chance. Check out the buttons below to get the five senses descriptions poster I use in my classroom and more descriptive writing activity ideas for free!
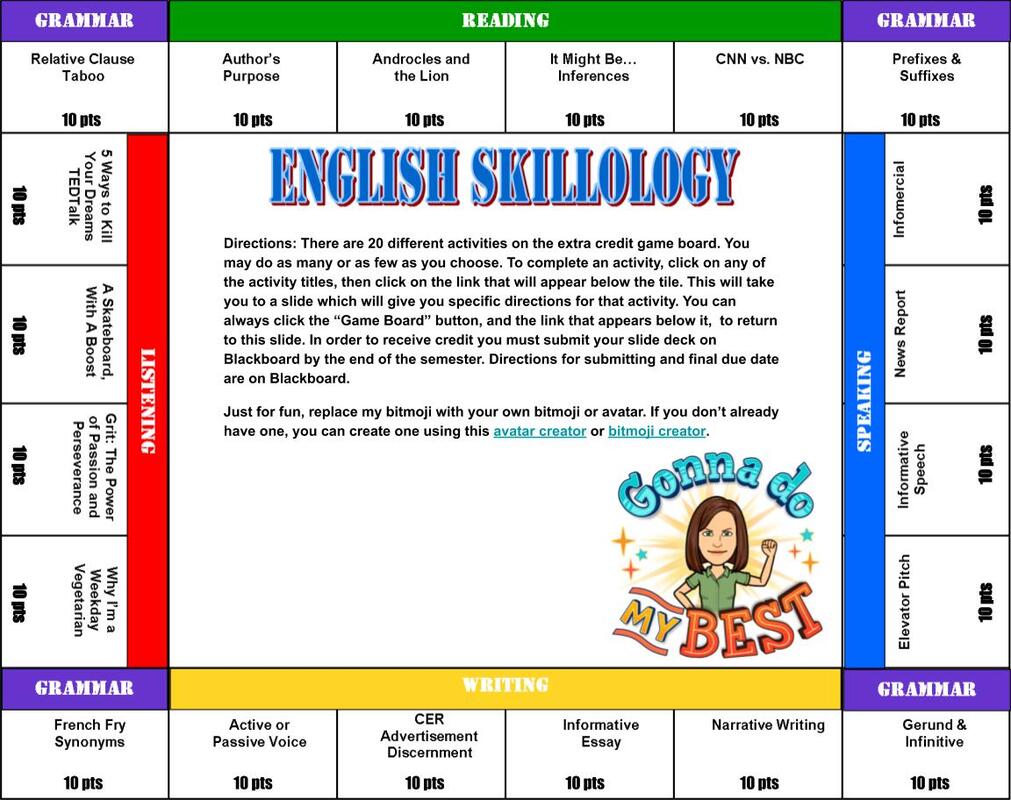
At the most basic level, English Skillology is a choice menu. It includes four activities for each of the five skill areas in ESL: reading, writing, speaking, listening, and grammar. Inspired by a Monopoly-style choice menu of someone else's, I decided to use a game board format for my own. Each skill is a side (grammar is in the corners), and has its own color. Students are then free to choose the number and type of activities they want to complete by the end of the semester. If a student were to complete all of the activities, he/she would earn 120 extra credit points.
I designed this particular board for my high intermediate students (I hope to create at least three more boards, one for each of the proficiency levels I teach.). In creating the activities I consulted two different sets of objectives: seventh grade Common Core ELA and the Core Competencies for my department at the college where I teach. Here's a quick overview of the 20 activities: Reading
So how did I create this extra credit menu? In the most general terms, here are the steps I took:
I'm really excited about this particular project. It was a lot of work to put together but I believe it will be very valuable for my students. I especially like how it allows them to earn extra credit by participating in meaningful learning activities. Don't forget to download your own copy of English Skillology from Teachers Pay Teachers today--it's free! |
I'm moving! Find me at my new home via the button below. If you've previously signed up to receive new post emails, please reenter your email on the new blog.
Categories
All
Archives
January 2021
|